
Creating a Spring Boot MVC Application Context: A Detailed Guide
Are you looking to create a Spring Boot MVC application context? If so, you’ve come to the right place. In this article, I’ll walk you through the process of creating a Spring Boot MVC application context, from setting up the project to deploying it as a WAR file. Let’s dive in!
Setting Up the Project

Before you start, make sure you have Java and Maven installed on your system. Once you have these prerequisites in place, follow these steps to set up your Spring Boot MVC project:
- Open your terminal or command prompt.
- Run the following command to create a new Spring Boot project:
mvn archetype:generate -DarchetypeArtifactId=org.springframework.boot:spring-boot-starter-parent -DgroupId=com.example -DartifactId=my-spring-boot-mvc-app -Dversion=2.3.4.RELEASEThis command will generate a new Spring Boot project with the specified group ID, artifact ID, and version. Once the project is created, navigate to the project directory using the following command:
cd my-spring-boot-mvc-appAdding Dependencies
In your project’s pom.xml file, you’ll need to add the following dependencies to enable MVC functionality:
| Dependency | Description |
|---|---|
spring-boot-starter-web |
Enables web application development with Spring Boot. |
spring-boot-starter-thymeleaf |
Enables Thymeleaf template engine for web applications. |
spring-boot-starter-tomcat |
Enables Tomcat server for web applications. |
Here’s an example of how your pom.xml file should look after adding these dependencies:
<dependencies> <dependency> <groupId>org.springframework.boot</groupId> <artifactId>spring-boot-starter-web</artifactId> </dependency> <dependency> <groupId>org.springframework.boot</groupId> <artifactId>spring-boot-starter-thymeleaf</artifactId> </dependency> <dependency> <groupId>org.springframework.boot</groupId> <artifactId>spring-boot-starter-tomcat</artifactId> </dependency></dependencies>Creating the Application Context
Now that you have the necessary dependencies, it’s time to create the application context. In your project’s root directory, create a new file called src/main/java/com/example/myspringbootmvcapp. Inside this directory, create a new Java class called Application.java. This class will serve as the entry point for your Spring Boot application.
package com.example.myspringbootmvcapp;import org.springframework.boot.SpringApplication;import org.springframework.boot.autoconfigure.SpringBootApplication;@SpringBootApplicationpublic class Application { public static void main(String[] args) { SpringApplication.run(Application.class, args); }}In the Application class, we use the @SpringBootApplication annotation to mark it as the main application class. The main method uses the SpringApplication.run method to start the application.
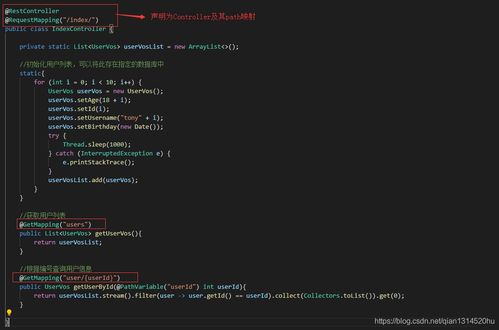
Creating a Controller
Next, let’s create a controller to handle HTTP requests. In the same package as the Application class, create a new Java class called HomeController.java. This class will contain a method to handle GET requests for the root URL.
package com.example.myspringbootmvc


