
Using SSH Config File Rule for GitLab Remote URL: A Detailed Guide
Managing multiple GitLab repositories can be a daunting task, especially when it comes to handling different remote URLs. One efficient way to streamline this process is by utilizing SSH config file rules. In this guide, I’ll walk you through the steps to set up SSH config file rules for GitLab remote URLs, ensuring a seamless and secure experience.
Understanding SSH Config File

The SSH config file is a simple text file that allows you to manage multiple SSH connections. It is located at ~/.ssh/config on Unix-like systems and C:UsersYourUsername.sshconfig on Windows. This file contains rules that define how SSH should handle different connections.
Here’s an example of a basic SSH config file:
Host github.com HostName github.com User git IdentityFile ~/.ssh/id_rsaHost gitlab.com HostName gitlab.com User git IdentityFile ~/.ssh/id_rsaIn this example, we have defined two hosts: github.com and gitlab.com. Each host has its own HostName, User, and IdentityFile. The IdentityFile specifies the private key to use for authentication.
Setting Up SSH Config File Rule for GitLab Remote URL
Now that you understand the basics of SSH config file, let’s dive into setting up a rule for GitLab remote URL.
Step 1: Generate SSH Key Pair
Before you can use SSH to connect to GitLab, you need to generate an SSH key pair. If you already have a key pair, skip this step.
ssh-keygen -t rsa -b 4096This command will generate a new SSH key pair with a 4096-bit RSA key. You will be prompted to enter a file path for the private key and a passphrase for added security. Press Enter to accept the default file path and passphrase.
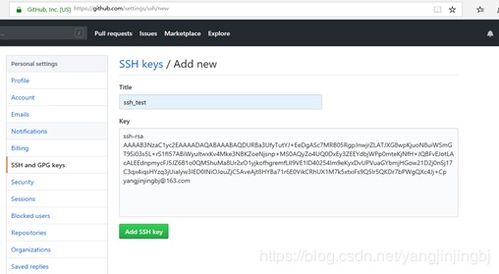
Step 2: Add SSH Key to GitLab Account
Once you have generated the SSH key pair, you need to add the public key to your GitLab account. Follow these steps:
- Log in to your GitLab account.
- Go to your profile settings.
- Select “SSH Keys” from the sidebar.
- Click the “Add SSH Key” button.
- Paste the contents of your public key (located at
~/.ssh/id_rsa.pub) into the “Key” field. - Enter a title for your key and click “Add key” to save it.
Step 3: Configure SSH Config File
Now that you have added your SSH key to GitLab, it’s time to configure the SSH config file. Open the file in a text editor and add the following rule for your GitLab remote URL:
Host gitlab-repo HostName gitlab.com User git IdentityFile ~/.ssh/id_rsaIn this example, we have defined a host named “gitlab-repo”. The HostName is set to gitlab.com, the User is git, and the IdentityFile is the path to your private key.
Step 4: Test SSH Connection
After configuring the SSH config file, you need to test the connection to ensure everything is working correctly. Run the following command:
ssh -T gitlab-repoThis command will attempt to establish an SSH connection to the GitLab server. If the connection is successful, you should see a message similar to “Hi YourUsername! You’ve successfully authenticated.”
Conclusion
Setting up SSH config file rules for GitLab remote URLs is a straightforward process that can greatly simplify your workflow. By following the steps outlined in this guide, you can easily manage multiple GitLab repositories and ensure a secure connection to your GitLab server.


