
Downgrade File Size Picture: A Comprehensive Guide
When it comes to managing digital images, one of the most common concerns is the file size. Large image files can be cumbersome to share, store, and upload. That’s where downgrading the file size of a picture comes into play. In this detailed guide, we’ll explore various methods and tools to help you reduce the size of your images effectively.
Understanding Image File Size

Before diving into the methods to downgrade file size, it’s essential to understand what contributes to the overall size of an image. An image file size is determined by several factors, including resolution, image format, and compression.
| Factor | Description |
|---|---|
| Resolution | Resolution refers to the number of pixels in an image. Higher resolution images have more pixels, which means they have more data to process, resulting in larger file sizes. |
| Image Format | Image formats like JPEG, PNG, and GIF have different compression techniques. JPEG is a lossy compression format, which means some data is lost during compression, resulting in smaller file sizes. PNG is a lossless compression format, which retains all image data but can still be compressed to a smaller size. |
| Compression | Compression is the process of reducing the amount of data in an image file. There are two types of compression: lossy and lossless. Lossy compression removes some data, while lossless compression retains all data but reduces the file size. |
Now that we have a basic understanding of image file size, let’s explore the methods to downgrade file size picture.
Using Image Editing Software
One of the most straightforward ways to downgrade file size picture is by using image editing software. Programs like Adobe Photoshop, GIMP, and Paint.NET offer various tools and features to resize and compress images.
Here’s a step-by-step guide to resizing and compressing an image using Adobe Photoshop:
- Open the image in Photoshop.
- Go to Image > Image Size.
- Enter the desired resolution and click OK. Keep in mind that reducing the resolution will decrease the image quality.
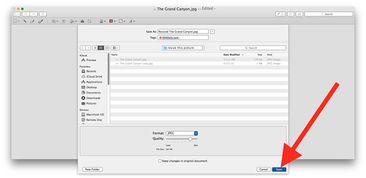
- Go to File > Save As and choose the desired image format (JPEG, PNG, etc.).
- In the Save As dialog box, click on the dropdown menu next to Quality and adjust the compression level. A lower quality setting will result in a smaller file size.
- Click Save to save the image with the new file size.
Using Online Tools

Online tools are another convenient way to downgrade file size picture. These tools are easy to use and require no installation. Some popular online image resizing and compression tools include TinyPNG, Compressor.io, and ImageOptim.
Here’s a step-by-step guide to using TinyPNG to downgrade file size picture:
- Visit the TinyPNG website (https://tinypng.com/).
- Click on the “Upload” button and select the image you want to resize.
- After the image is uploaded, TinyPNG will automatically compress it and display the new file size.
- Click on the “Download” button to save the compressed image to your computer.
Using Mobile Apps
Mobile apps are a convenient way to downgrade file size picture on the go. Many apps offer features to resize, compress, and even convert image formats. Some popular mobile apps for image resizing and compression include Adobe Photoshop Express, GIMP Mobile, and Compressor.
Here’s a step-by-step guide to using Adobe Photoshop Express to downgrade file size picture:
- Download and install Adobe Photoshop Express from the App Store or Google Play Store.
- Open the app and import the image you want to resize.
- Tap on the “Edit” button and select the “Resize” option.
- Enter the desired resolution and tap “Apply.” Keep in mind that reducing the resolution will decrease the image quality.
- Tap on the “Save” button to save the image with the new file size.


