
God Mode 9 File Location: A Comprehensive Guide
Are you looking for the God Mode 9 file location on your computer? If so, you’ve come to the right place. God Mode 9 is a powerful tool that allows users to access a wide range of settings and options that are not readily available through the standard Windows interface. In this guide, I will walk you through the process of finding the God Mode 9 file location on your system, as well as provide you with some tips on how to use it effectively.
Understanding God Mode 9

Before we dive into the file location, let’s take a moment to understand what God Mode 9 is and why it’s so popular among Windows users. God Mode 9 is essentially a folder that contains shortcuts to all the important settings and options in Windows. By accessing this folder, you can quickly navigate to various system settings, control panel options, and other useful tools without having to search through multiple menus and windows.
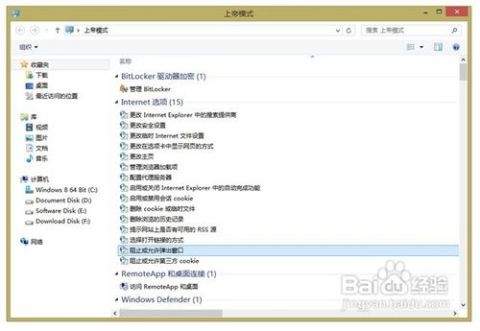
God Mode 9 is not an official feature of Windows, but it is a widely used workaround that has been around for many years. It is compatible with most versions of Windows, including Windows 7, Windows 8, and Windows 10.
Locating the God Mode 9 File
Now that we have a basic understanding of God Mode 9, let’s move on to finding the file location. There are a few different methods you can use to create a God Mode 9 folder on your computer. Here’s one of the most common methods:
- Right-click on an empty space on your desktop and select “New” > “Folder”.
- Type “GodMode” (without quotes) into the folder name field and press Enter.
- Right-click on the newly created GodMode folder and select “Properties”.
- In the “General” tab, click on “Customize” > “Change Icon”.
- Select an icon of your choice and click “OK” to close the window.
- Click “Apply” and then “OK” to save the changes.
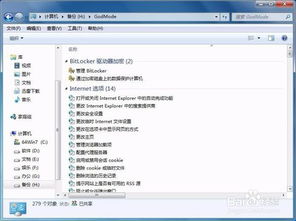
Once you have created the GodMode folder, you can access it by simply double-clicking on it. This will open a window that contains shortcuts to all the settings and options in Windows.
Table of God Mode 9 Shortcuts
| Category | Shortcut |
|---|---|
| System | System Properties |
| Control Panel | Control Panel |
| Power Options | Power Options |
| Device Manager | Device Manager |
| Task Scheduler | Task Scheduler |
| Group Policy Editor | Group Policy Editor |
| Windows Update | Windows Update |
| System Restore | System Restore |
| Backup and Restore | Backup and Restore |
| Performance Monitor | Performance Monitor |
| Event Viewer | Event Viewer |
| Services | Services |
| Command Prompt | Command Prompt |
| Windows PowerShell | Windows PowerShell |
As you can see, the GodMode folder contains a wealth of information and tools that can help you manage and customize your Windows system.
Using God Mode 9
Now that you have the GodMode folder on your desktop, you can start using it to access various settings and options. Here are a


