
Share Mac Files with Windows Users: A Lifewire Guide
Collaborating with Windows users can be a breeze if you know how to share files between a Mac and a PC. Whether you’re working on a team project or simply want to share your favorite music collection, this guide will walk you through the process step by step.
Understanding the Basics

Before diving into the specifics of sharing files, it’s important to understand the basic differences between Mac and Windows file systems. Macs use the HFS+ (Hierarchical File System Plus) or APFS (Apple File System) file system, while Windows uses NTFS (New Technology File System) or FAT32. These differences can affect how files are shared and accessed.
| File System | Mac | Windows |
|---|---|---|
| HFS+ (Hierarchical File System Plus) | Yes | No |
| APFS (Apple File System) | Yes | No |
| NTFS (New Technology File System) | No | Yes |
| FAT32 | No | Yes |
While Macs can read and write to NTFS and FAT32 drives, Windows cannot read or write to HFS+ or APFS drives without additional software. This is an important consideration when sharing files between the two operating systems.
Using a Shared Network Drive
One of the simplest ways to share files between a Mac and a Windows PC is by using a shared network drive. This allows you to access files on your Mac from any Windows computer on the same network.
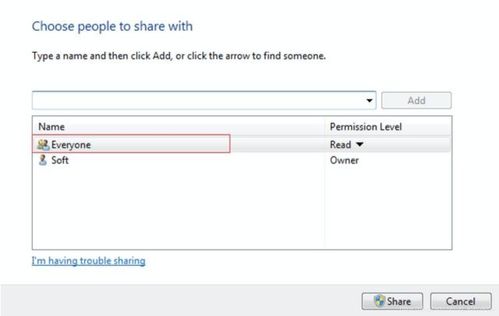
- On your Mac, open the “Sharing” preference pane and enable “File Sharing.” Select the folder you want to share and click “Start Sharing.”
- On your Windows PC, open File Explorer and navigate to “Network.” You should see your Mac listed as a shared device.
- Double-click on your Mac’s name to access the shared folder and files.
Keep in mind that you’ll need to enter the username and password for your Mac’s user account to access the shared files.
Using External Drives

Another option for sharing files between a Mac and a Windows PC is by using an external drive. This can be a USB flash drive, an external hard drive, or an SD card reader.
- Connect the external drive to your Mac and format it using the Mac’s preferred file system (HFS+ or APFS). This will ensure that the drive is compatible with your Mac.
- Connect the external drive to your Windows PC. Windows should automatically recognize the drive and format it using the NTFS file system.
- Copy files from your Mac to the external drive and then copy them to your Windows PC.
This method is straightforward and doesn’t require any additional software. However, it can be time-consuming if you need to share a large number of files.
Using Cloud Storage Services
Cloud storage services like Dropbox, Google Drive, and OneDrive offer a convenient way to share files between a Mac and a Windows PC. These services allow you to upload files to the cloud and access them from any device with an internet connection.
- Sign up for a cloud storage service and install the desktop application on both your Mac and Windows PC.
- Upload the files you want to share to the cloud storage service.
- Access the files from your Windows PC by opening the cloud storage service’s desktop application and navigating to the shared folder.
This method is particularly useful if you need to access your files from multiple devices or if you want to ensure that your files are backed up in case of a hardware failure.
Using Third-Party Software
For those who need more advanced file-sharing capabilities, there are several third-party software solutions available. These programs can help you sync files between a Mac and a Windows PC, share files over the internet, and even access your Mac’s


