
Windows File Explorer Color Folders: A Comprehensive Guide
Managing files and folders on your Windows computer can be a daunting task, especially when you have numerous files scattered across various directories. One of the most useful features in Windows File Explorer is the ability to color-code folders. This not only makes your file management more organized but also enhances your overall user experience. In this article, we will delve into the various aspects of using color folders in Windows File Explorer, including how to enable them, customize colors, and manage them effectively.
How to Enable Color Folders in Windows File Explorer

Enabling color folders in Windows File Explorer is a straightforward process. Here’s how you can do it:
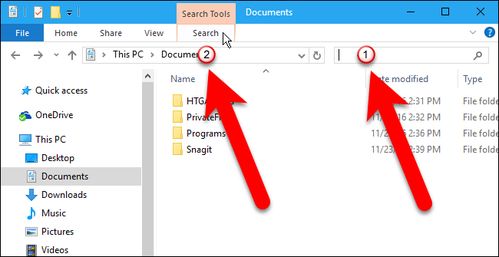
- Open Windows File Explorer.
- Click on the “View” tab at the top of the window.
- Look for the “Show/Hide” group and click on “Options” to expand the menu.
- Select “Change folder and search options” from the dropdown menu.
- In the “View” tab of the Folder Options window, scroll down and check the box next to “Apply a specific color to folders and files” under the “Files and Folders” section.
- Click “OK” to save the changes.
Once you’ve enabled color folders, you can start customizing the colors for your folders.
Customizing Colors for Folders
Customizing the colors for your folders is a simple process. Here’s how you can do it:
- Right-click on a folder in Windows File Explorer.
- Select “Properties” from the context menu.
- Go to the “Color” tab.
- Choose a color from the dropdown menu and click “OK” to apply the color to the folder.
You can also set a default color for new folders. To do this, follow these steps:
- Open the Folder Options window by clicking on “Change folder and search options” in the “View” tab of Windows File Explorer.
- Go to the “Files and Folders” tab.
- Under the “New folder” section, select a color from the dropdown menu and click “OK” to save the changes.
Managing Color Folders
Managing color folders in Windows File Explorer is quite simple. Here are some tips to help you manage them effectively:
- Organize by Color: You can sort your folders by color to make it easier to find the files you need. To do this, click on the “Name,” “Date modified,” or “Type” column header in the File Explorer window, and then click on the “Color” column header to sort by color.
- Customize Color Names: You can customize the color names to make them more meaningful. To do this, right-click on a folder, select “Properties,” go to the “Color” tab, and click on “Customize.” Enter a new name for the color and click “OK.” This change will be reflected in the color dropdown menu.
- Reset Colors: If you want to reset the colors to their default settings, open the Folder Options window, go to the “Files and Folders” tab, and click on “Reset Folders.” This will revert all folder colors to their default settings.
Color Folders vs. Tags and Categories
While color folders can be a great way to organize your files, it’s important to understand the differences between color folders, tags, and categories:
| Feature | Color Folders | Tags | Categories |
|---|---|---|---|
| Visual Categorization | Yes | No | No |
| Searchable | No | Yes | Yes |
| Customizable | Yes | Yes | Yes
|


