
How to Transfer Files from iPhone to Computer: A Comprehensive Guide
Transferring files from your iPhone to your computer is a task that many users encounter. Whether you need to backup important documents, share photos with friends, or simply free up space on your device, knowing how to do this efficiently is crucial. In this guide, I’ll walk you through various methods to transfer files from your iPhone to your computer, ensuring a seamless and hassle-free experience.
Using iTunes

One of the most common methods to transfer files from your iPhone to your computer is through iTunes. Here’s how you can do it:
- Connect your iPhone to your computer using a USB cable.
- Open iTunes on your computer. If you don’t have iTunes installed, you can download it from Apple’s official website.
- Once your iPhone is detected, click on its icon in the left sidebar.
- Select the “File Sharing” tab at the top of the window.
- Choose the app from which you want to transfer files. For example, if you want to transfer photos, select “Photos.” If you want to transfer documents, select the specific app from the list.
- Click on the “Import” button to transfer the files from your iPhone to your computer.
Using Finder on macOS
For macOS users, Finder offers a convenient way to transfer files from your iPhone to your computer. Here’s how to do it:
- Connect your iPhone to your Mac using a USB cable.
- Open Finder on your Mac.
- In the sidebar, click on “Devices” and select your iPhone.
- Double-click on the app from which you want to transfer files. For example, if you want to transfer photos, double-click on “Photos.” If you want to transfer documents, double-click on the specific app from the list.
- Drag and drop the files you want to transfer from the app to your computer.
Using Windows File Explorer
For Windows users, transferring files from your iPhone to your computer is equally straightforward using File Explorer. Here’s how to do it:
- Connect your iPhone to your computer using a USB cable.
- Open File Explorer on your computer.
- In the left pane, click on “This PC” or “Computer” and then expand the “Devices and Drives” section.
- Double-click on your iPhone to open it.
- Double-click on the app from which you want to transfer files. For example, if you want to transfer photos, double-click on “DCIM.” If you want to transfer documents, double-click on the specific app from the list.
- Drag and drop the files you want to transfer from the app to your computer.
Using Third-Party Apps
There are several third-party apps available that can help you transfer files from your iPhone to your computer. Some popular options include:
| App | Description |
|---|---|
| Dr.Fone – Transfer | Transfer files between iPhone, iPad, and computer. Supports various file types, including photos, videos, music, and documents. |
| iMazing | Manage and transfer files between iPhone, iPad, and computer. Offers advanced features like backup and restore, file management, and more. |
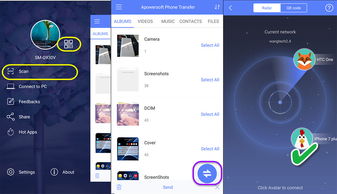
| Apowersoft Phone Manager | Manage and transfer files between iPhone, iPad, and computer. Supports various file types and offers additional features like backup and restore, app management, and more. |
These apps provide a user-friendly interface and additional features that may be more convenient for some users.
Using iCloud Drive
For users who prefer cloud storage, iCloud Drive offers a convenient way to transfer files from your iPhone to your computer. Here’s how to do it:
- On your iPhone, open the “Settings” app.
- Scroll down and tap on “iCloud.” Then, tap on “iCloud


