
Recover Overwritten Files on Mac: A Comprehensive Guide
Have you ever accidentally overwritten a crucial file on your Mac and found yourself in a panic? Don’t worry; you’re not alone. Data loss can be a frustrating experience, but there are ways to recover overwritten files on Mac. This guide will walk you through the process, providing you with multiple methods to retrieve your lost data.
Understanding Overwritten Files

When you overwrite a file, the new file takes the place of the old one, effectively erasing the original data. However, the deleted data may still be recoverable, depending on how the storage space was used after the deletion.
Here’s a quick overview of the file system on Mac:
| File System | Description |
|---|---|
| HFS+ (Hierarchical File System Plus) | Used in older Macs, supports file and folder permissions. |
| APFS (Apple File System) | Introduced with macOS High Sierra, optimized for SSDs and flash storage. |
Understanding the file system can help you choose the right method for recovering your overwritten files.
Method 1: Using the Mac Trash
The Trash on your Mac is a safety net for deleted files. If you’ve recently deleted a file and haven’t emptied the Trash, you can easily recover it.
- Open the Trash by clicking on its icon on the Dock.
- Locate the overwritten file you want to recover.
- Right-click on the file and select “Put Back” to restore it to its original location.
Remember, if you’ve emptied the Trash, you’ll need to use a different method to recover your files.
Method 2: Using File Recovery Software
There are several third-party file recovery tools available for Mac that can help you recover overwritten files. Some popular options include:
- Recuva
- Stellar Data Recovery
- EaseUS Data Recovery Wizard for Mac
Here’s a general guide on how to use file recovery software:
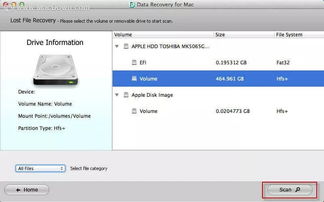
- Download and install the chosen file recovery tool.
- Launch the software and select the drive where the overwritten file was located.
- Start the scanning process. The software will search for deleted files.
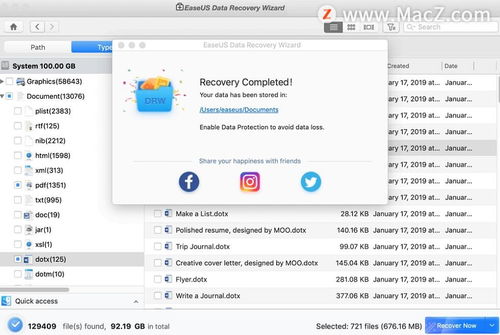
- Once the scan is complete, preview the recoverable files.
- Select the overwritten file you want to recover and choose a location to save it.
It’s important to note that the success rate of file recovery software can vary, and the sooner you use the software after the deletion, the higher the chances of successful recovery.
Method 3: Using Time Machine
If you have enabled Time Machine on your Mac, you can use it to restore your overwritten files from a previous backup.
- Connect an external drive or an AirPort Time Capsule to your Mac.
- Open the Time Machine app from the Dock or Applications folder.
- Click on the “Enter Time Machine” button.
- Use the timeline on the right side to navigate to the date when your file was last backed up.
- Locate the overwritten file and click on it to select it.
- Click on the “Restore” button to save the file to its original location.
Time Machine can be a lifesaver if you have regular backups. However, it’s essential to keep your backups up to date to ensure you can recover the most recent version of your files.
Method 4: Contacting a Professional Data Recovery Service
In some cases, the above methods may not work, or the overwritten file may be too important to risk trying DIY recovery methods. In such situations, it’s best to contact a professional data recovery service.
Professional data recovery services have advanced tools and expertise to recover data from damaged or corrupted storage devices. However, this method can be expensive, and there’s no guarantee of success.
Here are some reputable data recovery services:
- <


