
3D Print .STL Files: A Comprehensive Guide for Beginners and Experts
Are you intrigued by the world of 3D printing and looking to delve into the realm of .STL files? You’ve come to the right place. In this detailed guide, we’ll explore everything you need to know about 3D printing .STL files, from the basics to advanced techniques. Whether you’re a beginner or an experienced user, this article will provide you with valuable insights and tips to enhance your 3D printing journey.
Understanding .STL Files

Before we dive into the nitty-gritty of 3D printing .STL files, let’s first understand what they are. An .STL file, also known as a Stereolithography file, is a widely used file format for 3D printing. It represents a 3D model as a collection of connected triangles, making it an essential component in the 3D printing process.
STL files are created using various 3D modeling software, such as Blender, SolidWorks, and AutoCAD. These software programs allow users to design and manipulate 3D models, which can then be exported as .STL files. Once you have an .STL file, you can import it into a 3D printer or slicing software to prepare it for printing.
Importing .STL Files into Slicing Software

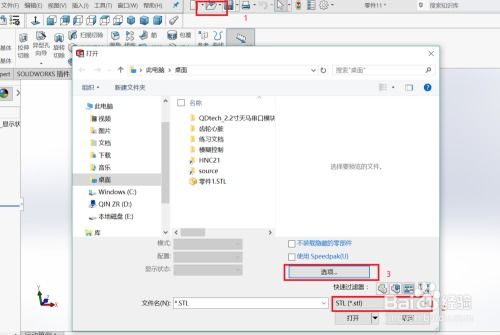
After creating or obtaining an .STL file, the next step is to import it into slicing software. Slicing software is crucial for 3D printing as it converts the .STL file into a series of instructions that the printer can understand. Here’s how to import an .STL file into slicing software:
- Open your slicing software and select the “Import” or “Open” option.
- Browse for the .STL file you want to import and click “Open” or “Import” to load it into the software.
- Once the file is imported, you may need to adjust the orientation and scaling of the model to ensure it prints correctly.
- After making any necessary adjustments, save the sliced file for printing.
Choosing the Right Slicing Settings
One of the most critical aspects of 3D printing is selecting the appropriate slicing settings. These settings determine the quality, speed, and success of your print. Here are some essential slicing settings to consider:
| Setting | Description |
|---|---|
| Layer Height | Controls the thickness of each layer in the print. A lower layer height results in higher resolution but slower printing. |
| Infill Density | Adjusts the amount of material inside the model. A higher infill density increases strength but may slow down the print. |
| Print Speed | Controls the speed at which the printer moves during the print. A higher speed can reduce print time but may decrease print quality. |
| Bed Leveling | Ensures the print bed is properly leveled with the nozzle. Proper bed leveling is crucial for successful prints. |
Experiment with different settings to find the optimal balance between print quality and speed for your specific printer and material.
3D Printing .STL Files: Tips and Tricks
Now that you have a basic understanding of .STL files and slicing settings, here are some tips and tricks to help you achieve the best results when 3D printing .STL files:
- Preheat the printer and material before starting the print to ensure optimal performance.
- Use a heated bed to prevent warping and improve adhesion, especially for larger prints.
- Use supports for overhanging or complex parts to ensure they print successfully.
- Keep the printer clean and well-maintained to prevent issues during the print process.
- Experiment with different materials and settings to find the best combination for your specific project.
Conclusion
3D printing .STL files can be a rewarding and exciting experience. By understanding the basics of .STL files, importing them into slicing software,


