
Upload File to AWS CLI from Local Machine: A Comprehensive Guide
Uploading files to AWS (Amazon Web Services) from your local machine is a crucial skill for anyone working with cloud storage and computing. The AWS Command Line Interface (CLI) provides a powerful and efficient way to manage your AWS resources, including file uploads. In this detailed guide, I’ll walk you through the process of uploading a file to AWS S3 (Simple Storage Service) using the AWS CLI, covering everything from installation to execution.
Prerequisites

Before you begin, ensure you have the following prerequisites in place:
- Installed AWS CLI on your local machine.
- Configured AWS CLI with your AWS credentials.
- Access to an AWS account with an S3 bucket.
Step 1: Install AWS CLI
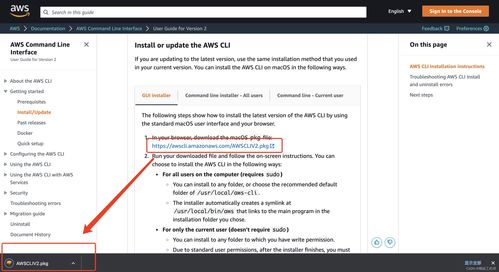
Visit the AWS CLI download page and download the appropriate version for your operating system. Follow the installation instructions provided by AWS for your specific OS.
Step 2: Configure AWS CLI

After installing the AWS CLI, you need to configure it with your AWS credentials. Open your command line interface and run the following command:
aws configureThis command will prompt you to enter your AWS access key ID, secret access key, default region, and default output format. Make sure to enter the correct information for your AWS account.
Step 3: Create an S3 Bucket
Before uploading a file, you need an S3 bucket to store it. Log in to the AWS Management Console, navigate to the S3 service, and create a new bucket. Choose a unique bucket name and select the appropriate region for your bucket.
Step 4: Upload a File to S3
Now that you have the AWS CLI installed, configured, and an S3 bucket created, you can upload a file to your bucket. Open your command line interface and run the following command:
aws s3 cp /path/to/local/file s3://bucket-name/Replace /path/to/local/file with the path to the file you want to upload and bucket-name with the name of your S3 bucket. The file will be uploaded to the root of your bucket. If you want to specify a different folder within the bucket, add a path after the bucket name, like this:
aws s3 cp /path/to/local/file s3://bucket-name/folder/Step 5: Verify the Upload
After the upload process is complete, you can verify that the file has been successfully uploaded to your S3 bucket. Log in to the AWS Management Console, navigate to the S3 service, and select your bucket. You should see the uploaded file listed in the bucket’s contents.
Step 6: Access the File
Once the file is uploaded to your S3 bucket, you can access it using various methods. For example, you can generate a pre-signed URL that allows you to download the file directly from the bucket:
aws s3 generate-presigned-url --bucket bucket-name --key file-nameThis command will return a URL that you can use to download the file. Alternatively, you can configure your S3 bucket to allow public access, which will make the file accessible to anyone with the URL.
Step 7: Manage Your Files
Using the AWS CLI, you can perform various operations on your files, such as listing files, deleting files, and setting permissions. For example, to list all files in your bucket, run the following command:
aws s3 ls s3://bucket-name/To delete a file, use the following command:
aws s3 rm s3://bucket-name/file-nameAnd to set permissions on a file, use the following command:
aws s3 cp /path/to/local/file s3://bucket-name/file-name --acl bucket-owner-full-controlConclusion
Uploading files to AWS S3 using the AWS CLI is a straightforward process once you have the necessary prerequisites in place. By following this guide, you should now be able to upload files to your S3 buckets, manage them, and access them as needed. Happy uploading!


