
Unlocking the Power of Melodyne 5: Open Melodyne 3 Files with Ease
Are you a music producer or audio engineer looking to harness the full potential of Melodyne 5? If so, you might have encountered the challenge of opening Melodyne 3 files in the latest version of the software. Fear not, as this comprehensive guide will walk you through the process step by step, ensuring a seamless transition from Melodyne 3 to Melodyne 5.
Understanding the Differences Between Melodyne 3 and Melodyne 5

Before diving into the specifics of opening Melodyne 3 files in Melodyne 5, it’s essential to understand the key differences between the two versions. Melodyne 5 offers a range of new features and improvements over its predecessor, including enhanced pitch correction, time-stretching capabilities, and a more intuitive user interface.
| Feature | Melodyne 3 | Melodyne 5 |
|---|---|---|
| Pitch Correction | Basic pitch correction with limited flexibility | Advanced pitch correction with more control and flexibility |
| Time Stretching | Limited time-stretching capabilities | Enhanced time-stretching with improved audio quality |
| User Interface | Traditional interface with some limitations | Intuitive and user-friendly interface with improved workflow |
With these differences in mind, let’s explore how to open Melodyne 3 files in Melodyne 5.
Step-by-Step Guide to Open Melodyne 3 Files in Melodyne 5
1. Launch Melodyne 5 and create a new project.
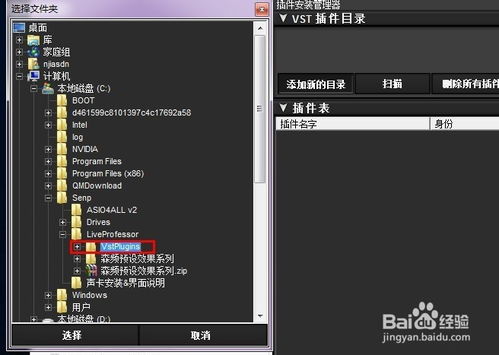
2. Import the Melodyne 3 file you wish to open into the project. To do this, go to the “File” menu and select “Import” > “Audio File.” Choose the Melodyne 3 file from your computer and click “Open.” Melodyne 5 will automatically convert the file to the appropriate format.
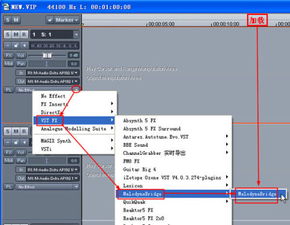
3. Once the file is imported, you’ll notice that the pitch correction and time-stretching algorithms have been applied. However, you may need to adjust the settings to achieve the desired results. To do this, click on the “Edit” button in the toolbar and select the appropriate tool for your task.
4. If you need to make further adjustments, you can use the “Edit” menu to access various options, such as “Pitch Correction,” “Time Correction,” and “Time Stretching.” Experiment with these settings to achieve the best possible results.
5. Once you’re satisfied with the adjustments, save your project by clicking “File” > “Save.” You can now export the file in the desired format, such as WAV or MP3, by going to “File” > “Export” > “Audio File.” Choose the appropriate settings and click “Export.”
Common Issues and Solutions
While opening Melodyne 3 files in Melodyne 5 is generally straightforward, you may encounter some issues along the way. Here are some common problems and their solutions:
- Audio Quality: If you notice a drop in audio quality after opening the Melodyne 3 file in Melodyne 5, try adjusting the sample rate and bit depth settings in the project preferences.
- Incompatible Plugins: If you’re using plugins that are not compatible with Melodyne 5, consider updating the plugins or finding alternatives that work with the latest version of the software.
- Project Settings: Ensure that the project settings in Melodyne 5 match those used in Melodyne 3, such as the sample rate and bit depth.
By following these steps and addressing common issues, you’ll be able to open Melodyne 3 files in Melodyne 5 with ease and take advantage of the powerful features offered by the latest version of the software.
Conclusion
Opening Melodyne 3 files in Melodyne 5 may seem daunting at first, but with this detailed guide, you’ll be


