
Ricoh Scan to File Setup: A Comprehensive Guide
Are you looking to streamline your document management process? Ricoh’s Scan to File feature is a powerful tool that can help you achieve just that. In this detailed guide, we’ll walk you through the setup process, ensuring you get the most out of this versatile feature.
Understanding Ricoh Scan to File

Ricoh Scan to File is a feature that allows you to scan documents directly to various file formats and destinations. Whether you need to save them to your computer, cloud storage, or email them to a colleague, this feature can save you time and effort.
System Requirements
Before you begin the setup process, make sure your system meets the following requirements:
| Component | Minimum Requirement |
|---|---|
| Operating System | Windows 10, macOS 10.13 or later |
| Scanner | Ricoh multifunction printer or scanner with Scan to File capability |
| Network Connection | Available Wi-Fi or Ethernet connection |
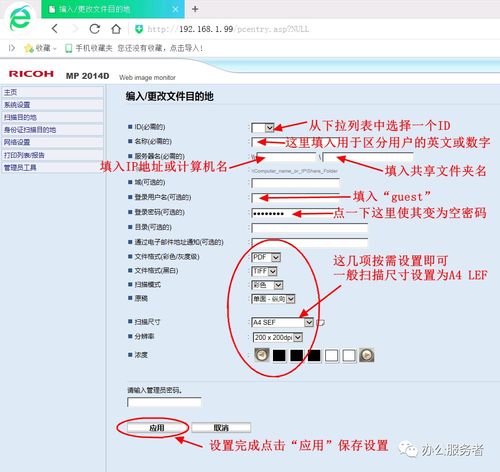
Step-by-Step Setup Guide
Follow these steps to set up Ricoh Scan to File on your device:
- Connect your Ricoh multifunction printer or scanner to your computer using a USB cable or Wi-Fi connection.
- Power on the device and wait for it to initialize.
- Open the scanner’s control panel or touch screen interface.
- Locate the Scan to File option and select it.
- Choose the desired file format for your scanned documents (e.g., PDF, JPEG, TIFF).
- Select the destination for your scanned documents (e.g., computer, cloud storage, email address).
- Configure any additional settings, such as image quality or file naming conventions.
- Save your settings and exit the Scan to File menu.
Customizing Your Scan to File Settings
Once you’ve set up the basic Scan to File options, you can customize your settings to better suit your needs:
- Image Quality: Adjust the resolution and color settings to ensure your scanned documents are clear and legible.
- File Naming Conventions: Set up a naming convention for your scanned documents to make them easier to organize and search for.
- Scan to Cloud Storage: Connect your cloud storage accounts (e.g., Google Drive, Dropbox) to automatically save your scanned documents to the cloud.
- Scan to Email: Configure your email settings to send scanned documents directly to your colleagues or clients.
Common Issues and Solutions
Here are some common issues you may encounter while setting up Ricoh Scan to File, along with their solutions:
- Problem: The scanner is not recognized by my computer.
- Solution: Ensure that the scanner is properly connected to your computer and that the necessary drivers are installed.
- Problem: I can’t save my scanned documents to my computer.
- Problem: The scan quality is poor.
- Solution: Adjust the image quality settings on the scanner’s control panel or touch screen interface.
Solution: Check that you have sufficient storage space on your computer and that the file format you’ve chosen is supported.
Conclusion
Ricoh Scan to File is a valuable feature that can help you manage your documents more efficiently. By following this comprehensive guide, you should be able to set up and customize the feature to suit your needs. If you encounter any issues, refer to the troubleshooting section for solutions. Happy scanning!


