
How to Fix .lnk Files Not Launching in Windows 11
Are you encountering issues with your Windows 11 system where .lnk files are not launching as expected? If so, you’re not alone. This common problem can be frustrating, but there are several methods you can try to resolve it. In this detailed guide, I’ll walk you through various approaches to fix .lnk files not launching in Windows 11.
Check for Antivirus Software Interference

One of the most common reasons why .lnk files may not launch is due to interference from antivirus software. Some antivirus programs may mistakenly flag .lnk files as threats and block them from executing. Here’s how you can check for and resolve this issue:
- Temporarily disable your antivirus software. This will allow you to test if the interference is coming from the antivirus program.
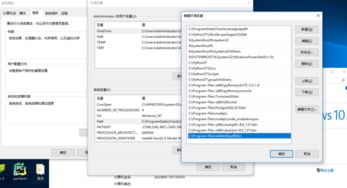
- Right-click on the .lnk file that’s not launching and select “Properties.” Go to the “Security” tab.
- Click on “Edit” and then “Add.” Enter the username of the account that owns the file and click “OK.” Click “Apply” and then “OK” to save the changes.
- Right-click on the .lnk file again and select “Run as administrator.” If the file launches successfully, it confirms that the interference was from the antivirus software.
- Update your antivirus software to the latest version or contact the support team for assistance.
Run System File Checker
The System File Checker is a built-in Windows tool that scans for and repairs corrupted system files. To run the System File Checker, follow these steps:
- Press the “Windows” key and type “cmd” in the search bar. Right-click on “Command Prompt” and select “Run as administrator.”
- In the Command Prompt window, type “sfc /scannow” and press “Enter.” The scan may take some time to complete.
- After the scan is finished, restart your computer and check if the .lnk files are launching correctly.
Check for Group Policy Restrictions
Group Policy settings can sometimes prevent .lnk files from launching. To check for and resolve this issue, follow these steps:
- Press the “Windows” key and type “gpedit.msc” in the search bar. Press “Enter” to open the Group Policy Editor.
- Navigate to “User Configuration” > “Administrative Templates” > “Windows Components” > “Windows Explorer.”
- Look for the “Disable Launching of Programs from the Desktop” policy. If it’s enabled, double-click on it and select “Not Configured” or “Disabled.” Click “OK” to save the changes.
- Restart your computer and check if the .lnk files are launching correctly.
Check for File Associations
Incorrect file associations can also cause .lnk files to not launch. To check and fix file associations, follow these steps:
- Right-click on the .lnk file that’s not launching and select “Open with.” Choose the appropriate program from the list or click “Choose another app.”
- Check the box next to “Always use this app to open .lnk files” and click “OK.”
- Restart your computer and check if the .lnk files are launching correctly.
Check for Corrupted User Profile
A corrupted user profile can cause various issues, including problems with .lnk files. To check for and fix a corrupted user profile, follow these steps:
- Press the “Windows” key and type “Control Panel” in the search bar. Press “Enter” to open Control Panel.
- Go to “User Accounts” > “Manage Accounts.” Click on the account that’s experiencing issues and select “Change account type.”
- Click on “Manage another account” and select the account with the corrupted profile. Click “Delete the account.”
- Follow the prompts to create a new user account and transfer the files from the corrupted account to the new one.
- Restart your computer and check if the .lnk files are launching correctly.
Check for Corrupted System Files
Corrupted system files


