
Allow TeamViewer File Transfer Without Logging In: A Comprehensive Guide
TeamViewer is a widely-used remote desktop software that allows users to access and control a computer from another location. One of its most useful features is the ability to transfer files between computers. However, by default, you need to log in to initiate a file transfer. In this article, I will guide you through the process of allowing TeamViewer file transfer without logging in, covering various aspects such as system requirements, configuration, and troubleshooting.
System Requirements

Before you start, ensure that your computer meets the following requirements:
| Operating System | Minimum Requirements |
|---|---|
| Windows | Windows 7 or later |
| macOS | macOS 10.10 or later |
| Linux | Ubuntu 16.04 or later, Debian 9 or later, Fedora 28 or later, openSUSE Leap 15.0 or later |
Additionally, ensure that both computers have TeamViewer installed and are running the latest version.
Configuring TeamViewer
Follow these steps to configure TeamViewer on both computers to allow file transfer without logging in:
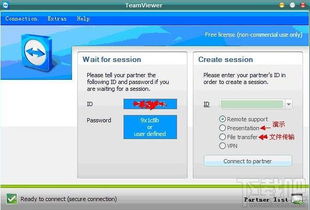
- Open TeamViewer on the computer you want to access (Host Computer).
- Click on the “ID” tab to view your TeamViewer ID and password.
- Copy the TeamViewer ID and password.
- Open TeamViewer on the computer you want to access from (Guest Computer).
- Enter the TeamViewer ID and password you copied from the Host Computer.
- Select “Files” from the menu on the left side of the TeamViewer window.
- Click on “Transfer Files” to start the file transfer process.
Now, you can transfer files between the two computers without logging in. However, keep in mind that the Guest Computer will have limited access to the Host Computer, and you will need to manually allow access to specific files or folders.
Alternative Method: Using TeamViewer QuickSupport
TeamViewer QuickSupport is a lightweight version of TeamViewer that can be used to access a computer without installing the full version. Here’s how to use it for file transfer:
- Download and run TeamViewer QuickSupport on the Host Computer.
- Copy the ID and password displayed on the TeamViewer QuickSupport window.
- Open TeamViewer on the Guest Computer and enter the ID and password.
- Select “Files” from the menu on the left side of the TeamViewer window.
- Click on “Transfer Files” to start the file transfer process.
This method is useful when you need to access a computer quickly without installing the full TeamViewer version.
Security Considerations
While allowing TeamViewer file transfer without logging in can be convenient, it’s essential to consider security implications:
- Use Strong Passwords: Ensure that both computers have strong, unique passwords to prevent unauthorized access.
- Keep TeamViewer Updated: Regularly update TeamViewer to the latest version to benefit from security patches and improvements.
- Use a Firewall: Enable a firewall on both computers to monitor incoming and outgoing connections.
- Limit Access: Only share the TeamViewer ID and password with trusted individuals.
Troubleshooting
Here are some common issues you may encounter while allowing TeamViewer file transfer without logging in:
- Unable to Connect: Ensure that both computers are connected to the internet and that the TeamViewer ID and password are correct.
- File Transfer Not Working: Check that the “Files” option is enabled on both computers and that you have the necessary permissions to access the files or folders.
- Slow Transfer Speed: Ensure that both computers have a stable internet connection, and consider using a wired connection for faster transfer speeds.


