
How to Zip Excel Files in Windows 10
Managing multiple Excel files can be quite cumbersome, especially when you need to transfer them or store them in a more compact format. Zipping Excel files can help you save space and make the process of sharing or storing them much more efficient. In this guide, I’ll walk you through the steps to zip Excel files in Windows 10, ensuring that you can do it with ease and confidence.
Using the Built-in Windows 10 Compression Tool

One of the simplest ways to zip Excel files in Windows 10 is by using the built-in compression tool. Here’s how you can do it:
- Open the folder containing your Excel files.
- Right-click on any Excel file and select “New” from the context menu.
- Choose “Compressed (zipped) folder” from the options that appear.
- A new folder with a “.zip” extension will be created in the same location as your Excel files.
- Drag and drop your Excel files into the newly created zip folder.
- Once all the files are inside the zip folder, right-click on the zip folder and select “Send to” > “Compressed (zipped) folder” to create a new zip file.
This method is straightforward and doesn’t require any additional software. However, it’s worth noting that the files will be compressed within the same folder structure.
Using Third-Party Software
While the built-in compression tool is convenient, it may not offer all the features you need. In such cases, using third-party software can be beneficial. Here are a few popular options:
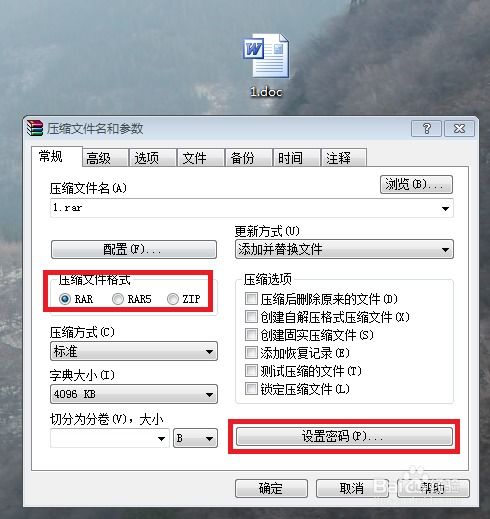
- WinRAR: WinRAR is a powerful compression tool that allows you to zip and unzip files with ease. It offers a variety of features, including password protection and file encryption.
- 7-Zip: 7-Zip is a free and open-source file archiver that supports a wide range of file formats. It’s known for its high compression ratio and fast performance.
- WinZip: WinZip is a popular compression tool that offers a user-friendly interface and a variety of features, including file encryption and password protection.
Here’s how to use WinRAR to zip Excel files:
- Download and install WinRAR from the official website.
- Open the folder containing your Excel files.
- Right-click on any Excel file and select “Add to archive” from the context menu.
- In the “Archive name and parameters” window, enter a name for your zip file and choose the desired compression settings.
- Click “OK” to create the zip file.
Using Online Tools
For those who prefer not to install any software on their computer, online tools can be a great alternative. These tools allow you to zip files directly from your web browser. Here are a few popular online zip tools:
- ZipGenius: ZipGenius offers a user-friendly interface and supports a wide range of file formats. It also allows you to password-protect your zip files.
- Online-Convert: Online-Convert allows you to zip and unzip files directly from your web browser. It supports a variety of file formats and offers a simple, one-click process.
- Smallpdf: Smallpdf offers a range of tools for working with PDF files, including the ability to zip and unzip files. It’s a convenient option if you frequently work with PDFs and Excel files.
Here’s how to use ZipGenius to zip Excel files:
- Visit the ZipGenius website and upload your Excel files.
- Select the desired compression settings and click “Create archive.”
- Download the zip file to your computer.
Additional Tips
When zipping Excel files, here are a few additional tips to keep in mind:
- Check the file size: Before zipping your files, check their individual sizes. This will help you determine the most efficient compression settings.
- Use strong passwords: If you’re using password protection, make sure to use a strong password to keep your files secure


