
Understanding Royal TSX: A Comprehensive Guide

Are you looking for a robust and versatile SSH client for your Mac? Look no further than Royal TSX. This powerful tool offers a wide range of features that make remote server management a breeze. In this article, I’ll walk you through the ins and outs of Royal TSX, providing you with a detailed guide to help you get the most out of this fantastic software.
Installation and Setup
Before diving into the nitty-gritty of Royal TSX, you’ll need to download and install the software. You can find the latest version of Royal TSX on the official website, Royal Apps. Once the download is complete, simply follow the installation wizard to get Royal TSX up and running on your Mac.
Plugins and Configuration
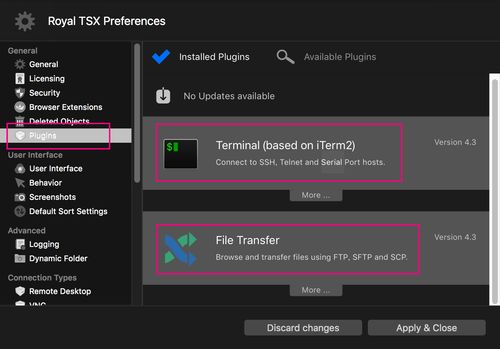
Royal TSX is a plugin-based application, which means you can extend its functionality by installing additional plugins. To install plugins, click on the Royal TSX icon in the top-left corner of the application, then select Preferences. In the left-hand menu, click on Plugins, and you’ll see a list of available plugins. To install a plugin, simply click on it, and then click Apply & Close. Restart Royal TSX for the changes to take effect.
| Plugin | Description |
|---|---|
| Terminal | Enables you to connect to remote servers via SSH and manage them through a terminal interface. |
| File Transfer | Allows you to transfer files to and from remote servers using protocols like SFTP and SCP. |
| Web | Enables you to connect to web servers and manage them through a web-based interface. |
| Database | Enables you to connect to and manage databases on remote servers. |
Creating a Document
Royal TSX organizes your connections into Documents. To create a new Document, click on the File menu, then select New Document. You’ll be prompted to give your Document a name and select a location to save it. Once you’ve created a Document, you can start adding connections to it.
Adding a Connection
With your Document created, you can now add a connection to a remote server. To do this, right-click on the Connections folder within your Document, then select Add. From the list of connection types, choose Terminal to create an SSH connection.
Configuring the Connection
When you select Terminal as your connection type, you’ll be prompted to enter the following information:
- Display Name: A name for your connection, which will be displayed in the Royal TSX interface.
- Connection Type: Select SSH as the connection type.
- Port: Enter the port number for your SSH connection (default is 22).
- Computer Name: Enter the IP address or hostname of the remote server.
- Credentials: Enter your username and password for the remote server.
Connecting to the Server
Once you’ve entered all the necessary information, click Apply & Close to save your connection. To connect to the server, simply double-click on the connection in the Royal TSX interface. You’ll be prompted to enter your password, and once authenticated, you’ll be connected to the remote server via SSH.
Using Royal TSX
Now that you’re connected to the remote server, you can use Royal TSX to manage your server. You can execute commands, transfer files, and even manage databases, all from within the Royal TSX interface. The software provides a user-friendly and intuitive interface that makes it easy to navigate and perform tasks.
Customizing Your Experience
Royal TSX offers a variety of customization options to tailor the software to your needs. You can change the appearance of the interface, create keyboard shortcuts, and even set up custom scripts to automate


