
Using FileZilla to Transfer Files Between Two PCs: A Comprehensive Guide
Transferring files between two computers can be a daunting task, especially if you’re not familiar with the technicalities involved. However, with the right tool, such as FileZilla, the process can be made much simpler. In this article, I’ll walk you through the steps of using FileZilla to transfer files between two PCs, covering everything from installation to troubleshooting.
Why Use FileZilla?

FileZilla is a popular, open-source FTP client that’s widely used for transferring files between computers. It’s known for its user-friendly interface, reliability, and powerful features. Here are a few reasons why you might choose FileZilla over other file transfer tools:
- Free and Open Source: FileZilla is completely free to use and its source code is available for anyone to inspect and modify.
- Easy to Use: The interface is straightforward and intuitive, making it easy for beginners to get started.
- Supports Multiple Protocols: In addition to FTP, FileZilla also supports SFTP and FTPS, providing more flexibility in how you transfer files.
- Extensive Features: FileZilla offers a range of features, including drag-and-drop file transfers, file searching, and directory comparison.
System Requirements
Before you can start using FileZilla, you’ll need to ensure that your system meets the minimum requirements:
| Operating System | Processor | RAM | Storage |
|---|---|---|---|
| Windows, macOS, Linux | 1 GHz or faster | 512 MB or more | 100 MB of free space |
These requirements are quite modest, so you should have no trouble running FileZilla on most modern computers.
Installing FileZilla
Now that you know what FileZilla is and what you need to run it, let’s get started with the installation process:
- Visit the FileZilla website at https://filezilla-project.org/download.php.
- Select the appropriate version of FileZilla for your operating system.
- Download the installer and run it on your computer.
- Follow the on-screen instructions to complete the installation.
Once the installation is complete, you can launch FileZilla by clicking on its icon in the Start menu (Windows) or Applications folder (macOS/Linux).
Setting Up FileZilla
Before you can start transferring files, you’ll need to set up FileZilla with the necessary information:
- In the FileZilla window, you’ll see two panels: one for your local files and one for the remote files on the server you’re connecting to.
- In the left panel, click on the “Site Manager” button (it looks like a gear) to open the Site Manager dialog.
- In the Site Manager, click the “New Site” button to create a new connection.
- Enter a name for your site in the “Host” field. This can be the IP address or domain name of the server you’re connecting to.
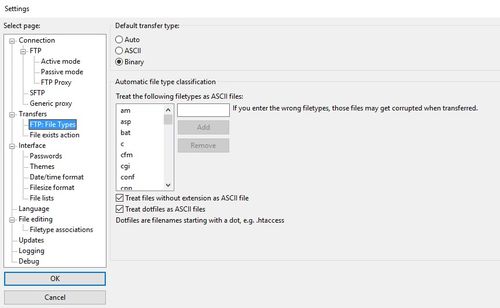
- Select the protocol you want to use (FTP, SFTP, or FTPS) from the “Type” dropdown menu.
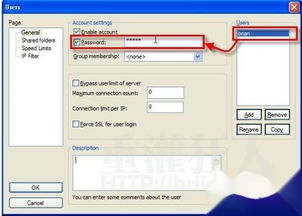
- Enter the username and password for the server in the respective fields.
- Click “Connect” to establish a connection to the server.
Once you’re connected, you’ll see the remote files in the right panel. You can now start transferring files by dragging and dropping them between the local and remote panels.
Transferring Files
Transferring files with FileZilla is straightforward:
- In the left panel, navigate to the folder on your local computer that contains the files you want to transfer.
- In the right panel, navigate to the folder on the remote server where you want to place the files.


