
How to Move an Outlook PST File: A Comprehensive Guide
Managing your Outlook Personal Folders (.pst) file is an essential task for anyone who relies on Outlook for their email, calendar, and contacts. Moving your PST file can be necessary for various reasons, such as upgrading to a new computer, consolidating data, or simply organizing your files. In this detailed guide, I’ll walk you through the process of moving your Outlook PST file step by step.
Understanding PST Files

Before diving into the moving process, it’s crucial to understand what a PST file is. PST stands for Personal Folders, and it’s a file format used by Microsoft Outlook to store email messages, calendar events, contacts, and other data. PST files can become quite large over time, and moving them can help maintain the performance of your Outlook application.
Preparation Before Moving Your PST File
Before you start moving your PST file, ensure you have the following:
- Backup: Always create a backup of your PST file before making any changes. This ensures that you can recover your data in case something goes wrong.
- Storage Space: Make sure you have enough storage space on the new location where you’ll be moving your PST file.
- Outlook: Ensure that Outlook is closed on both the source and destination computers.
Method 1: Manually Moving the PST File
One of the simplest ways to move your PST file is by manually copying it to the new location.
- Open File Explorer on your computer.
- Navigate to the location where your PST file is currently stored.
- Right-click on the PST file and select “Copy.”
- Open the new location where you want to move the PST file.
- Right-click in the empty space and select “Paste.”
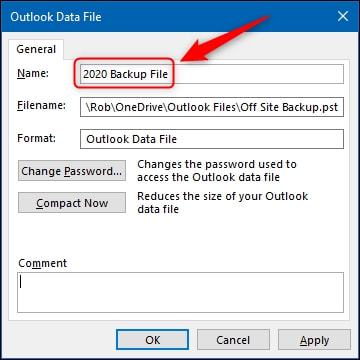
- Open Outlook and go to “File” > “Options.”
- In the “Advanced” tab, click on “Data Files.”
- Select the new PST file from the list and click “OK.”
Method 2: Using the “Move to Folder” Feature
Outlook has a built-in feature that allows you to move your PST file directly from within the application.
- Open Outlook and go to “File” > “Options.”
- In the “Advanced” tab, click on “Data Files.”
- Select the PST file you want to move from the list.
- Click on “Move to Folder.”
- Select the new location for your PST file and click “OK.”
- Follow the prompts to confirm the move.
Method 3: Using PowerShell
PowerShell is a powerful command-line tool that can be used to move PST files. This method is suitable for advanced users who are comfortable with using the command line.
- Open PowerShell ISE or any other PowerShell editor.
- Enter the following command, replacing “sourcePath” with the path to your current PST file and “destinationPath” with the path to the new location:
- Import-PSTData -PSTFile “sourcePath” -DestinationMailbox “destinationPath”
- Press Enter to execute the command.
Method 4: Using Third-Party Software
There are several third-party tools available that can help you move your PST file. These tools often offer additional features, such as the ability to split large PST files or convert them to other formats.


