
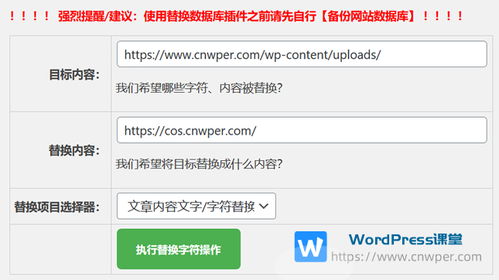
Replacing Files in WP-Content/Uploads via FTP: A Detailed Guide for You
Managing files in your WordPress website’s uploads directory is an essential task for any website owner. Whether you need to replace an image, a document, or any other file, using FTP (File Transfer Protocol) can be a powerful tool. In this guide, I’ll walk you through the process of replacing files in the WP-content/uploads directory, step by step, ensuring you have a smooth and efficient experience.
Understanding the WP-Content/Uploads Directory

The WP-content/uploads directory is where all your media files are stored. This includes images, documents, videos, and any other files you upload through your WordPress media library. It’s important to understand the structure of this directory to navigate it effectively.
| Folder Name | Description |
|---|---|
| year | Contains subfolders for each year of uploads. |
| month | Contains subfolders for each month within a year. |
| day | Contains subfolders for each day within a month. |
| uploads | Contains the actual media files. |
By understanding this structure, you can easily locate and replace files within your uploads directory.
Setting Up FTP
Before you can replace files in your uploads directory, you need to set up FTP. If you haven’t already, you’ll need an FTP client. There are many free and paid options available, such as FileZilla, Cyberduck, and WinSCP.
Once you have an FTP client installed, follow these steps to connect to your website:
- Open your FTP client and enter your website’s FTP credentials. These are typically provided by your hosting provider.
- Enter your website’s FTP address, which is usually in the format of ftp://yourdomain.com.
- Click “Connect” to establish a connection to your website.
Once connected, you should see a list of files and folders on the left-hand side of your FTP client. This is your website’s file structure.
Navigating to the WP-Content/Uploads Directory
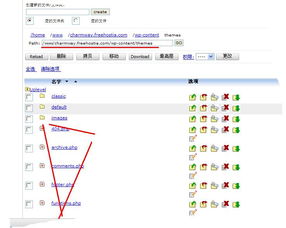
Now that you’re connected to your website via FTP, you need to navigate to the WP-content/uploads directory. Here’s how you can do it:
- In the left-hand pane of your FTP client, double-click on the “public_html” or “httpdocs” folder.
- Double-click on the “wp-content” folder.
- Double-click on the “uploads” folder.
Once you’re in the uploads folder, you’ll see all the files and folders related to your media uploads. This is where you’ll replace the files you need.
Replacing a File
Now that you’re in the correct directory, let’s replace a file. Here’s how to do it:
- Locate the file you want to replace. You can search for the file name or scroll through the list of files.
- Right-click on the file and select “Download” or “Save As.” This will save a copy of the file to your local computer.
- Locate the new file you want to upload. This could be a new version of the file or a completely different file.
- Right-click on the new file and select “Upload” or “Upload to Folder.” Choose the “uploads” folder as the destination.
- Wait for the upload to complete. Once it’s done, the new file will replace the old file in your uploads directory.
It’s important to note that if the file you’re replacing is being used in a post or page, you may need to update the file URL in the post or page to reflect the new file name.
Conclusion
Replacing files in the WP-content/uploads directory via FTP is a straightforward process once you understand the file structure and how to navigate your FTP client. By following the steps outlined in this guide, you can efficiently manage your website’s media files


