
Setting Application Context for a WAR File in Spring Boot: A Detailed Guide
When working with Spring Boot applications, you might encounter scenarios where you need to set up an application context for a WAR (Web Archive) file. This process is essential for integrating legacy applications or third-party libraries that are packaged as WAR files. In this guide, I’ll walk you through the steps and considerations involved in setting up an application context for a WAR file in Spring Boot.
Understanding the ContextLoaderListener

The ContextLoaderListener is a key component in the Spring framework that initializes the application context. When you deploy a WAR file in a servlet container like Tomcat, the ContextLoaderListener is automatically registered. However, in a Spring Boot application, you might need to configure it manually.
Here’s how you can register the ContextLoaderListener in your Spring Boot application:
import org.springframework.boot.SpringApplication;import org.springframework.boot.autoconfigure.SpringBootApplication;import org.springframework.web.context.ContextLoaderListener;@SpringBootApplicationpublic class MySpringBootApplication { public static void main(String[] args) { SpringApplication app = new SpringApplication(MySpringBootApplication.class); app.addListeners(new ContextLoaderListener()); app.run(args); }}Configuring theWAR File

Once you have the ContextLoaderListener in place, you need to configure the WAR file itself. This involves specifying the location of the WAR file and any additional configuration files that might be required.
Here’s an example of how you can configure the WAR file in your Spring Boot application:
import org.springframework.boot.SpringApplication;import org.springframework.boot.autoconfigure.SpringBootApplication;import org.springframework.web.context.ContextLoaderListener;@SpringBootApplicationpublic class MySpringBootApplication { public static void main(String[] args) { SpringApplication app = new SpringApplication(MySpringBootApplication.class); app.addListeners(new ContextLoaderListener()); app.setSources(new String[]{"/path/to/your/war/file.war"}); app.run(args); }}Handling Dependencies
When deploying a WAR file, it’s important to ensure that all the required dependencies are included. This includes libraries, frameworks, and any other resources that the application relies on.
Here’s how you can handle dependencies in your WAR file:
- Include all the necessary JAR files in the WEB-INF/lib directory of the WAR file.
- Use Maven or Gradle to manage dependencies and generate the WAR file.
Configuring the Servlet Container
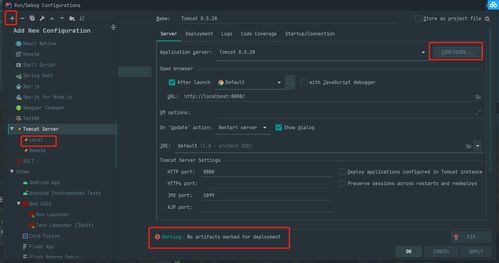
The servlet container, such as Tomcat, plays a crucial role in deploying and running the WAR file. You need to configure the servlet container to ensure that it can handle the application correctly.
Here’s an example of how you can configure Tomcat to run your Spring Boot application:
<?xml version="1.0" encoding="UTF-8"?><server xmlns="http://xmlns.jcp.org/xml/ns/javaee" xmlns:xsi="http://www.w3.org/2001/XMLSchema-instance" xsi:schemaLocation="http://xmlns.jcp.org/xml/ns/javaee http://xmlns.jcp.org/xml/ns/javaee/web-app_3_1.xsd" version="3.1"> <service name="Catalina"> <engine name="Catalina" defaultHost="localhost"> <host name="localhost" appBase="webapps" unpackWARs="true" autoDeploy="true"> <context path="/" docBase="/path/to/your/war/file.war"/> </host> </engine> </service></server>Testing the Application
After setting up the application context and deploying the WAR file, it’s essential to test the application to ensure that it’s functioning correctly. You can perform various tests, such as unit tests, integration tests, and end-to-end tests, to verify the application’s behavior.
Here’s an example of how you can write a simple test to verify the application’s functionality:
import org.junit.jupiter.api.Test;import org.springframework.beans.factory.annotation.Autowired;import org.springframework.boot.test.context.SpringBootTest;import org.springframework.boot.test.web.client.TestRestTemplate;import org.springframework.boot.web.server.LocalServerPort;import org.springframework.http.ResponseEntity;import static org.junit.jupiter.api.Assertions.assertEquals;@SpringBootTest(webEnvironment = SpringBootTest.WebEnvironment.RANDOM_PORT)public class MyApplicationTests { @Autowired private TestRest


