
Playing WAV Files on Raspberry Pi with Node-RED: A Detailed Guide for You
Are you looking to add some audio flair to your Raspberry Pi project? Do you want to play WAV files with ease using Node-RED? If so, you’ve come to the right place. In this guide, I’ll walk you through the process of setting up Node-RED to play WAV files on your Raspberry Pi. Let’s dive in!
Understanding the Basics

Before we get started, let’s go over some basics. Node-RED is a flow-based programming tool that allows you to wire together hardware devices, APIs, and online services. It’s built on Node.js, which means it’s powerful and flexible. WAV files are a popular audio format that stores audio in an uncompressed, lossless format.
Here’s what you’ll need to get started:
- Raspberry Pi (any model will do)
- MicroSD card with Raspberry Pi OS installed
- WAV file you want to play
- USB sound card (optional, but recommended)
Setting Up Your Raspberry Pi
First, make sure your Raspberry Pi is powered off and disconnected from any power source. Insert the MicroSD card into your Raspberry Pi and connect it to a power source. Once the Raspberry Pi boots up, you’ll be greeted with the desktop environment.
Now, let’s install Node-RED. Open a terminal window and run the following command:
sudo apt-get updatesudo apt-get install node-redThis will install Node-RED on your Raspberry Pi. Once the installation is complete, you can start Node-RED by running the following command:
node-redNode-RED will open in your default web browser. You should see a blank canvas with a few nodes on the left-hand side. This is where you’ll build your flow.
Adding Nodes to Your Flow
Now that you have Node-RED running, it’s time to add the nodes you’ll need to play a WAV file. On the left-hand side, you’ll see a list of nodes. Scroll down until you find the “Audio” category. Click on it to expand the category and you’ll see two nodes: “Audio Player” and “Audio File.”
Drag and drop the “Audio File” node onto your canvas. Double-click on the node to open its configuration window. In the “File” field, enter the path to your WAV file. If you’re using a USB sound card, make sure to select the correct device in the “Device” field. If you’re not using a USB sound card, leave this field blank.
Next, drag and drop the “Audio Player” node onto your canvas. Connect the output of the “Audio File” node to the input of the “Audio Player” node. Double-click on the “Audio Player” node to open its configuration window. Make sure the “Play” button is enabled.
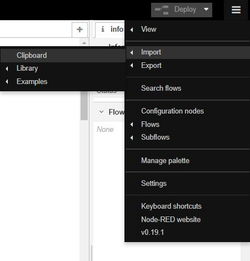
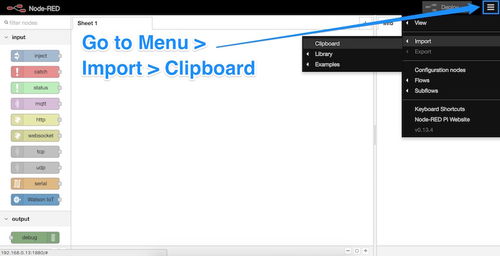
Now, click the “Deploy” button at the top of the Node-RED window. This will deploy your flow and start playing the WAV file.
Customizing Your Flow
Once your flow is deployed and the WAV file is playing, you can customize it further. For example, you can add a “Button” node to your flow to control the playback of the WAV file. Connect the output of the “Button” node to the “Play” input of the “Audio Player” node. Now, when you click the button, the WAV file will play.
You can also add “Audio Gain” nodes to adjust the volume of the WAV file. Connect the output of the “Audio File” node to the input of the “Audio Gain” node, and then connect the output of the “Audio Gain” node to the input of the “Audio Player” node. Double-click on the “Audio Gain” node to open its configuration window and adjust the gain level as desired.
Conclusion
Playing WAV files on your Raspberry Pi with Node-RED is a straightforward process. By following this guide, you should now be able to play WAV files on your Raspberry Pi using Node-RED. Have fun experimenting with different audio files and flows!
| Node | Description |
|---|---|
| Audio File | Loads and plays an
|


