
Understanding the Windows File Hosts Path: A Detailed Guide for You
Have you ever wondered where the Windows File Hosts path is located on your computer? If you’re a tech-savvy individual or just someone who wants to delve deeper into the workings of their system, understanding the Windows File Hosts path is crucial. In this article, I’ll take you through the ins and outs of the Windows File Hosts path, providing you with a comprehensive guide tailored specifically for you.
What is the Windows File Hosts Path?

The Windows File Hosts path is a crucial component of your computer’s operating system. It is a text file that maps hostnames to IP addresses. This file is used by the operating system to resolve domain names to their corresponding IP addresses, allowing you to access websites and other network resources without manually entering their IP addresses.
Locating the Windows File Hosts Path
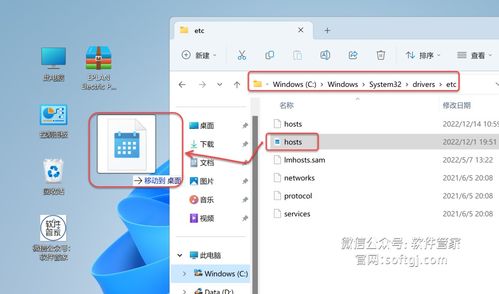
Now that you understand what the Windows File Hosts path is, let’s dive into how to locate it on your Windows computer. The path to the Windows File Hosts file is typically:
| Windows Version | Path |
|---|---|
| Windows 10 and Windows 11 | C:WindowsSystem32driversetchosts |
| Windows 8 and Windows 7 | C:WindowsSystem32driversetchosts |
| Windows XP | C:WindowsSystem32driversetchosts |
As you can see, the path to the Windows File Hosts file remains consistent across different versions of Windows. To access this file, simply open File Explorer, navigate to the specified path, and open the hosts file.
Editing the Windows File Hosts Path
Now that you know where the Windows File Hosts path is located, you might be wondering how to edit it. Editing the Windows File Hosts path can be useful for various reasons, such as testing new websites or blocking access to certain domains. Here’s how to edit the Windows File Hosts path:
- Open File Explorer and navigate to the Windows File Hosts path (as mentioned above).
- Right-click on the hosts file and select “Open with.” Choose a text editor, such as Notepad, from the list of available programs.
- Make the necessary changes to the file. Each line in the hosts file should contain a hostname and its corresponding IP address, separated by a space. For example:
127.0.0.1 localhost 127.0.0.1 localdomain ::1 localhost ::1 localdomain
After making the changes, save the file and close the text editor. The changes will take effect immediately, and your computer will start resolving the hostnames according to the new mappings.
Common Uses of the Windows File Hosts Path
The Windows File Hosts path has several practical uses, including:
- Testing Websites: You can use the Windows File Hosts path to test new websites or web applications without accessing them through a browser. This can be useful for developers or anyone who wants to test a website’s functionality.
- Blocking Websites: By adding a hostname and its corresponding IP address to the Windows File Hosts path, you can block access to certain websites. This can be helpful for parents who want to restrict their children’s access to inappropriate content.
- Improving Performance: In some cases, using the Windows File Hosts path can improve the performance of your computer by reducing the time it takes to resolve domain names.
Conclusion
Understanding the Windows File Hosts path is essential for anyone who wants to have a deeper understanding of their computer’s operating system. By following the steps outlined in this article, you can easily locate, edit, and utilize the Windows File Hosts path to enhance your computing experience. Remember to exercise caution when making changes to the hosts file, as


