
Add SharePoint to File Explorer: A Comprehensive Guide
Integrating SharePoint with your File Explorer can significantly enhance your productivity and streamline your workflow. By adding SharePoint to File Explorer, you can easily access and manage your SharePoint files directly from your desktop. In this detailed guide, we will explore the various methods to add SharePoint to File Explorer, the benefits of doing so, and the steps to configure it effectively.
Why Add SharePoint to File Explorer?

Adding SharePoint to File Explorer offers several advantages:
-
Quick Access: Access your SharePoint files directly from your desktop without navigating to the SharePoint website.
-
Improved Productivity: Spend less time searching for files and more time working on them.
-
Seamless Collaboration: Share and collaborate on files with your team more efficiently.
Methods to Add SharePoint to File Explorer
There are several methods to add SharePoint to File Explorer. Let’s explore each one in detail:
1. Using the ‘Map Network Drive’ Feature
This method involves mapping a network drive to your SharePoint site. Here’s how to do it:
-
Open File Explorer.
-
Click on ‘This PC’ on the left-hand side.
-
Right-click on ‘This PC’ and select ‘Map Network Drive’.
-
In the ‘Map Network Drive’ dialog box, select a drive letter and enter the SharePoint site URL (e.g., https://yoursharepointsite.com/sites/yoursite).
-
Click ‘Finish’ to map the network drive.
2. Using the ‘Connect to a Web Location’ Feature
This method allows you to connect to a SharePoint site using a web link. Here’s how to do it:
-
Open File Explorer.
-
Click on ‘This PC’ on the left-hand side.
-
Right-click on ‘This PC’ and select ‘Add a network location’.
-
In the ‘Add Network Location’ wizard, click ‘Next’.
-
Select ‘Choose a custom network location’ and click ‘Next’.
-
In the ‘Internet or network path’ field, enter the SharePoint site URL (e.g., https://yoursharepointsite.com/sites/yoursite).
-
Click ‘Next’, then ‘Finish’ to connect to the SharePoint site.
3. Using the ‘Open with Windows Explorer’ Feature
This method involves opening the SharePoint site in Windows Explorer. Here’s how to do it:
-
Open File Explorer.
-
Enter the SharePoint site URL (e.g., https://yoursharepointsite.com/sites/yoursite) in the address bar.
-
Press Enter, and the SharePoint site will open in Windows Explorer.
Configuring SharePoint in File Explorer
Once you have added SharePoint to File Explorer, you can configure it to suit your needs. Here are some configuration options:
1. Customize the View
File Explorer allows you to customize the view of your SharePoint files. Here’s how to do it:
-
Right-click on the SharePoint folder in File Explorer.
-
Select ‘Properties’.
-
Go to the ‘View’ tab.
-
Check or uncheck the options you want to customize, such as ‘Show hidden files, folders, and drives’ or ‘Hide protected operating system files (Recommended)’.
-
Click ‘Apply’ and then ‘OK’ to save the changes.
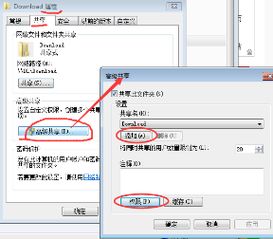
2. Set Permissions
File Explorer allows you to set permissions for your SharePoint files. Here’s how to do it:
-
Right-click on the SharePoint folder in File Explorer.
-
Select ‘Properties’.


