
Using VSCode to Compare Two Files: A Detailed Guide
Comparing two files can be a crucial task, whether you’re a developer looking for code differences or a user trying to merge documents. Visual Studio Code (VSCode) offers a robust feature for comparing files, making it easier to identify and manage changes. In this guide, I’ll walk you through the process of comparing two files in VSCode, covering various aspects to ensure you get the most out of this feature.
Opening the Compare Files Window

VSCode’s compare feature is accessed through the built-in GitLens extension, which provides a seamless experience for comparing files. To open the compare files window, follow these steps:
- Open VSCode.
- Go to the Extensions view by clicking on the Extensions icon on the sidebar or pressing `Ctrl+Shift+X`.
- Search for “GitLens” and install the extension if you haven’t already.
- Once installed, click on the GitLens icon in the sidebar.
- Select “Compare Files” from the dropdown menu.
Alternatively, you can use the keyboard shortcut `Ctrl+K` followed by `Ctrl+C` to open the compare files window directly.
Selecting Files to Compare

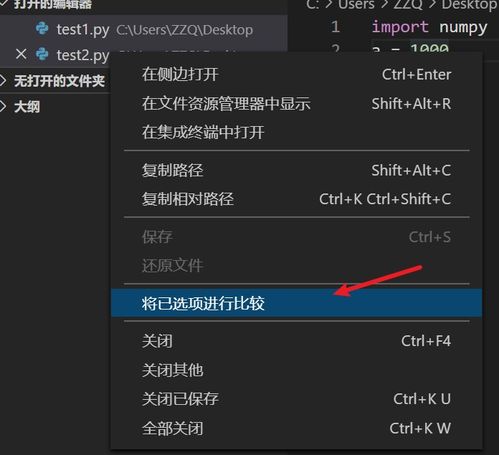
After opening the compare files window, you’ll see a list of files in your repository. To compare two files, follow these steps:
- Click on the first file you want to compare.
- Click on the “Add” button next to the file name.
- Repeat the process for the second file.
Once both files are added, you’ll see a preview of the differences in the main window. You can expand and collapse sections to focus on specific areas of interest.
Understanding the Comparison Results
VSCode’s compare feature provides a clear and intuitive way to view the differences between two files. Here’s what you can expect:
- Line-by-line Comparison: The comparison window shows the differences line by line, making it easy to identify changes.
- Color Coding: Different colors are used to highlight added, removed, and modified lines.
- Side-by-Side View: The files are displayed side by side, allowing you to easily compare corresponding lines.
Additionally, you can use the following features to enhance your comparison experience:
- Toggle Line Numbers: Click on the line numbers to toggle their visibility.
- Toggle Word Wrap: Enable word wrap to view the entire content of a line.
- Toggle Side-by-Side View: Click on the “Side-by-Side” button to toggle the side-by-side view.
Using the Compare Files Window
Here’s a brief overview of the compare files window’s features:
| Feature | Description |
|---|---|
| File List | Displays a list of files in your repository. |
| Compare Button | Click to compare the selected files. |
| Close Button | Click to close the compare files window. |
| Toggle Side-by-Side View | Toggle the side-by-side view of the files. |
| Toggle Line Numbers | Toggle the visibility of line numbers. |
| Toggle Word Wrap | Toggle word wrap for the files. |
By utilizing these features, you can efficiently compare files and make the necessary changes.
Conclusion
VSCode’s compare files feature is a powerful tool for identifying and managing differences between two files. By following this guide, you should now have a solid understanding of how to use this feature effectively. Whether you’re a developer or a user, VSCode’s compare files feature can save you time


