
Make MIDI File from Yamaha Arranger Keyboard: A Comprehensive Guide
Transforming the music you play on your Yamaha Arranger Keyboard into a MIDI file can be a rewarding experience. MIDI files are versatile and widely used in various music production and performance contexts. Whether you’re a hobbyist or a professional musician, learning how to create MIDI files from your keyboard can enhance your musical journey. In this guide, we’ll explore the process step by step, ensuring you have a seamless experience.
Understanding MIDI Files

MIDI (Musical Instrument Digital Interface) files are a standard digital audio format that allows electronic musical instruments, computers, and other audio devices to communicate with each other. Unlike audio files, which store the actual sound, MIDI files store instructions for how the music should be played. This makes them highly efficient and useful for various applications, such as composition, arrangement, and live performance.
Preparation
Before diving into the process, ensure you have the following:
- A Yamaha Arranger Keyboard
- A computer with a MIDI interface or a compatible USB-MIDI cable
- Music production software capable of importing MIDI files (e.g., FL Studio, Logic Pro, Ableton Live)
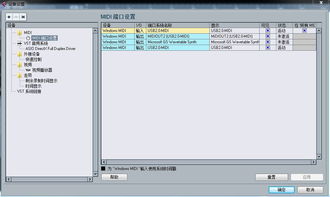
Connecting Your Keyboard to the Computer
Connect your Yamaha Arranger Keyboard to your computer using a MIDI interface or a USB-MIDI cable. Ensure that the connection is secure and that both devices are powered on. Once connected, your computer should recognize the keyboard as a new MIDI device.
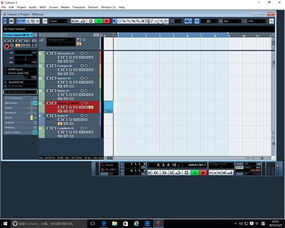
Recording Your Performance
Open your music production software and select the MIDI track where you want to record your performance. Most software offers a variety of virtual instruments and effects to choose from. Here’s how to record your performance:
- Set the tempo and time signature in your music production software to match the song you’re playing.
- Play your Yamaha Arranger Keyboard, and the software will record the MIDI data as you play.
- Monitor the recording to ensure the timing and pitch are accurate.
Editing Your MIDI File
Once you’ve recorded your performance, it’s time to edit the MIDI file. This step is crucial for ensuring the quality of your final product. Here are some common editing tasks:
- Quantize: Quantize the MIDI data to correct timing issues and make the performance sound more polished.
- Transpose: Transpose the MIDI file to a different key if needed.
- Adjust velocity: Modify the velocity of notes to add expression and dynamics to your performance.
- Remove unwanted notes: Eliminate any accidental notes or mistakes from your performance.
Exporting Your MIDI File
After editing, export your MIDI file from the music production software. Most software offers various export options, such as WAV, MP3, and MIDI. Choose the appropriate format based on your needs. For example, if you want to share your performance with others, exporting as a WAV or MP3 file would be ideal.
Using Your MIDI File
Now that you have your MIDI file, you can use it in various ways:
- Practice: Use the MIDI file as a practice tool to improve your playing skills.
- Composition: Incorporate the MIDI file into your compositions or arrangements.
- Live Performance: Use the MIDI file as a backing track for live performances.
- Teaching: Share the MIDI file with students for learning purposes.
Common Challenges and Solutions
Here are some common challenges you may encounter when creating MIDI files from your Yamaha Arranger Keyboard, along with potential solutions:
| Challenge | Solution |
|---|---|
| Timing issues | Quantize the MIDI data to correct timing issues. |
| Inaccurate pitch | Adjust the pitch bend range in your music production software. |
| Unwanted noise | Use noise
|


