
Find Deactivated Folder and File: A Comprehensive Guide
Managing digital files and folders can be a daunting task, especially when you have a vast collection of data stored on your computer. Over time, some of these files and folders may become inactive or outdated, cluttering your system and potentially causing performance issues. In this guide, I will walk you through the process of identifying and dealing with deactivated folders and files on your computer. Whether you’re a casual user or a professional, these steps will help you maintain an organized and efficient digital workspace.
Understanding Deactivated Files and Folders

Before diving into the methods to find deactivated files and folders, it’s essential to understand what they are. Deactivated files are those that are no longer in use or relevant to your current projects. These can include old documents, deleted files, or files that have been moved to another location. Deactivated folders, on the other hand, are directories that contain these inactive files or are no longer needed for your work.
Method 1: Using the Search Function

The first method to find deactivated files and folders is by utilizing the search function on your computer. This method is straightforward and can be done on both Windows and macOS systems.
Windows:
- Open the File Explorer by pressing the Windows key + E.
- In the search bar at the top right corner, type in a keyword that you believe would be associated with the deactivated files or folders.
- Click on the search icon or press Enter.
- Review the search results and identify any files or folders that seem outdated or no longer relevant.
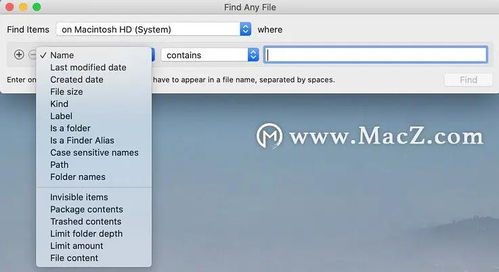
macOS:
- Open Finder by clicking on the Finder icon in the Dock.
- Click on the search icon in the top right corner.
- Enter a keyword that you think would be associated with the deactivated files or folders.
- Sort the search results by date or type to identify the most recent or oldest files and folders.
- Review the search results and identify any files or folders that seem outdated or no longer relevant.
Method 2: Using File Recovery Software
For those who have accidentally deleted or lost files and folders, file recovery software can be a lifesaver. These tools can scan your computer’s storage and recover deleted or lost files. Here are some popular file recovery software options:
| Software | Price | Features |
|---|---|---|
| Recuva | Free | Supports various file formats, easy-to-use interface |
| EaseUS Data Recovery Wizard | Free version available | Supports a wide range of devices, preview recovered files |
| Stellar Data Recovery | Free version available | Supports multiple file formats, recover data from formatted drives |
Method 3: Checking the Recycle Bin or Trash
When you delete a file or folder on your computer, it often ends up in the Recycle Bin (Windows) or Trash (macOS). These are temporary storage locations for deleted items, and you can recover them before they are permanently deleted.
Windows:
- Open the Recycle Bin by double-clicking on its icon on the desktop.
- Locate the deleted files or folders you want to recover.
- Right-click on the item and select “Restore” to move it back to its original location.
macOS:
- Open the Trash by clicking on its icon in the Dock.
- Locate the deleted files or folders you want to recover.
- Right-click on the item and select “Put Back” to move it back to its original location.


