
Windows 10 Clearing Temp Files: A Comprehensive Guide
Managing temporary files on your Windows 10 computer is crucial for maintaining optimal performance and freeing up valuable disk space. Temporary files are created by various applications and the operating system itself, and over time, they can accumulate and take up significant storage. In this detailed guide, we will explore different methods to clear temporary files on Windows 10, ensuring that your system remains efficient and clutter-free.
Understanding Temporary Files

Temporary files are created by applications and the operating system to store temporary data that is no longer needed. These files are typically stored in the C:UsersYourUsernameAppDataLocalTemp directory. While they serve a purpose, they can become outdated and unnecessary, leading to a cluttered system and potential performance issues.
Using the Disk Cleanup Tool
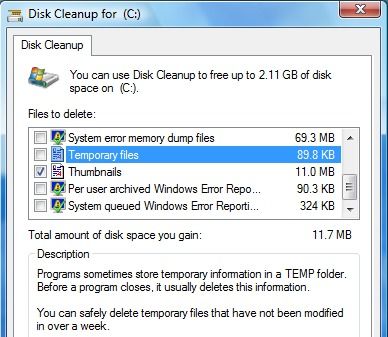
The Disk Cleanup tool is a built-in Windows 10 utility that can help you remove unnecessary files, including temporary files. Here’s how to use it:
- Press
Windows + Sto open the Search box, then type “Disk Cleanup” and select the tool from the search results. - Select the drive you want to clean up (usually the C: drive) and click “OK.” The tool will analyze the drive and display a list of files that can be deleted.
- Check the boxes next to “Temporary files” and “System files” to select these files for deletion.
- Click “OK” to confirm the deletion. The tool will then remove the selected files from your drive.
Using the Command Prompt
The Command Prompt is a powerful tool that can be used to delete temporary files from your Windows 10 system. Here’s how to do it:
- Press
Windows + Xand select “Command Prompt (Admin)” from the menu. - In the Command Prompt window, type the following command and press Enter:
DEL /Q /F /S /A C:UsersYourUsernameAppDataLocalTemp.- This command will delete all temporary files in the specified directory. You can replace “YourUsername” with your actual username if necessary.
- After the deletion is complete, close the Command Prompt window.
Using Third-Party Cleaning Tools
There are several third-party cleaning tools available that can help you clear temporary files from your Windows 10 system. Some popular options include CCleaner, IObit Advanced SystemCare, and Wise Disk Cleaner. These tools often offer more advanced features and customization options compared to the built-in Disk Cleanup tool.
Here’s how to use CCleaner as an example:
- Download and install CCleaner from the official website.
- Open CCleaner and click on the “Cleaner” tab.
- Select “Windows” from the list of categories on the left.
- Check the boxes next to “Temporary files” and “System files” to select these files for deletion.
- Click “Run Cleaner” to remove the selected files from your system.
Regular Maintenance
Regularly clearing temporary files is essential for maintaining a healthy and efficient Windows 10 system. Here are some tips to help you stay on top of this task:
- Set up a regular schedule to run the Disk Cleanup tool or a third-party cleaning tool.
- Uninstall unnecessary applications to reduce the number of temporary files created.
- Keep your system updated to ensure that any outdated temporary files are removed automatically.
Conclusion
Clearing temporary files on your Windows 10 system is a simple yet effective way to improve performance and free up disk space. By using the built-in Disk Cleanup tool, the Command Prompt, or third-party cleaning tools, you can ensure that your system remains efficient and clutter-free. Regular maintenance and following the tips outlined in this guide will help you keep your Windows 10 system running smoothly.


