
Using pscp.exe to Copy Files from Linux to Windows: A Detailed Guide
Transferring files between different operating systems can be a daunting task, especially when you’re working with Linux and Windows. However, with the right tools, the process can be streamlined and made much more efficient. One such tool is pscp.exe, a command-line utility that allows you to copy files from a Linux server to a Windows machine. In this article, we’ll delve into the details of using pscp.exe to facilitate this transfer, covering installation, configuration, and usage scenarios.
Understanding pscp.exe

pscp.exe, short for PuTTY Secure Copy, is a part of the PuTTY suite, which is a free implementation of Telnet, SSH, and other network protocols. It is designed to work with PuTTY’s SSH client to securely transfer files between different systems. The utility uses SSH for encryption, ensuring that your data remains secure during transmission.
Installation
Before you can start using pscp.exe, you need to have it installed on your Windows machine. You can download the PuTTY suite from the official website (https://www.putty.org/). Once downloaded, extract the contents of the zip file to a directory of your choice. The pscp.exe file will be located within the ‘putty’ folder.
Configuring SSH on Linux
On the Linux server from which you want to copy files, you need to ensure that SSH is installed and configured. Most Linux distributions come with SSH pre-installed. To check if SSH is installed, open a terminal and run the following command:
ssh -V
This command will display the version of SSH installed on your system. If SSH is not installed, you can install it using your distribution’s package manager. For example, on Ubuntu, you can use the following command:
sudo apt-get install openssh-server
After installing SSH, you need to configure it to allow connections from your Windows machine. This involves editing the SSH configuration file, usually located at /etc/ssh/sshd_config. Open the file in a text editor and look for the following lines:
PermitRootLogin noPasswordAuthentication yes
Change ‘no’ to ‘yes’ for both lines. This will allow you to log in using a password. Save the file and restart the SSH service:
sudo systemctl restart ssh
Using pscp.exe
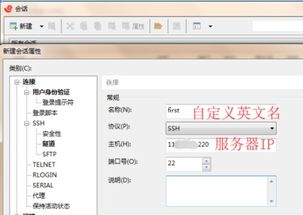
Now that you have pscp.exe installed and SSH configured on your Linux server, you can start using the utility to copy files. Open a command prompt on your Windows machine and navigate to the directory where you extracted the PuTTY suite. Then, run the following command:
pscp username@linuxserver:/path/to/file /path/to/destination
Replace ‘username’ with your Linux username, ‘linuxserver’ with the IP address or hostname of your Linux server, ‘/path/to/file’ with the path to the file you want to copy, and ‘/path/to/destination’ with the path where you want to save the file on your Windows machine.
For example, if you want to copy a file named ‘example.txt’ from your Linux server to the ‘Documents’ folder on your Windows machine, the command would be:
pscp username@linuxserver:/home/username/example.txt C:UsersYourUsernameDocumentsexample.txt
Advanced Usage
pscp.exe offers several options that can be used to customize the file transfer process. Here are some of the most commonly used options:
| Option | Description |
|---|---|
| -r | Recursively copy directories |
| -v | Verbose output |
| -P | Port number to use for SSH connection |
| -i | Private key file for SSH authentication |
For example, to recursively copy a directory from your Linux server to your Windows machine, you would use the following command:
pscp -r username@linuxserver:/path/to/directory /path/to/destination
Conclusion
Using pscp.exe to


