
Get File Path in MacBook: A Comprehensive Guide
Understanding how to locate the file path on your MacBook is essential for efficient file management and troubleshooting. Whether you’re a seasoned pro or a beginner, this guide will walk you through various methods to find the file path on your MacBook. Let’s dive in!
Using Finder

Finder is the default file manager on macOS, and it provides a straightforward way to locate file paths. Here’s how you can do it:
- Open Finder by clicking on the Finder icon in the Dock or pressing Command + Space and typing “Finder” in the Spotlight search bar.
- Click on the folder where your file is located in the sidebar. If you’re not sure, you can start from the root directory (Macintosh HD) and navigate through the folders.
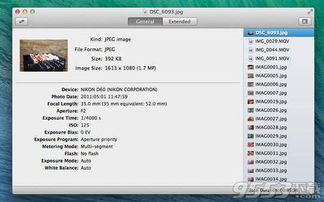
- Right-click on the file you want to find the path for and select “Get Info” from the context menu.
- In the “Get Info” window, look for the “Where” section. The path to the file will be displayed there.
Using Terminal
For those who prefer a more command-line approach, Terminal is a great tool to find file paths. Here’s how to do it:
- Open Terminal by searching for it in Spotlight or by navigating to Applications > Utilities > Terminal.
- Use the `pwd` command to display the current working directory. This will give you an idea of where you are in the file system.
- Use the `cd` command to navigate to the directory where your file is located. For example, if your file is in the Documents folder, you can use `cd ~/Documents`.
- Once you’re in the correct directory, use the `ls` command to list the files and directories. The file path will be displayed next to the file name.
Using Spotlight

Spotlight is a powerful search tool on macOS that can help you find files and their paths quickly. Here’s how to use it:
- Press Command + Space to open Spotlight search.
- Enter the name of the file you’re looking for in the search bar.
- When the file appears in the search results, right-click on it and select “Show in Finder” from the context menu.
- Once the file opens in Finder, you can use the methods described earlier to find the file path.
Using Keyboard Shortcuts
Keyboard shortcuts can be a quick and convenient way to find file paths. Here are a few useful shortcuts:
| Shortcut | Description |
|---|---|
| Command + I | Open the “Get Info” window for the selected file or folder. |
| Command + Shift + G | Open the “Go to Folder” dialog, where you can enter a file path directly. |
| Command + T | Open a new Finder window. |
Using Third-Party Applications
There are several third-party applications available that can help you find file paths on your MacBook. Some popular options include:
- Path Finder: A powerful file manager with advanced features, including a built-in file path finder.
- Path Finder: A file management tool that allows you to search for files and view their paths in a tree view.
- Path Finder: A file management application that provides a quick and easy way to find file paths.
Conclusion
Locating file paths on your MacBook can be a simple task with the right tools and methods. By using Finder, Terminal, Spotlight, keyboard shortcuts, and third-party applications, you can easily find the file paths you need. Whether you’re managing files, troubleshooting issues, or simply organizing your MacBook, these methods will help you


