
How to Upload Files to Google Drive: A Detailed Guide
Uploading files to Google Drive is a straightforward process that allows you to store, access, and share your documents, photos, and other files from anywhere. Whether you’re a student, professional, or just someone looking to keep their files organized, Google Drive is an excellent choice. In this guide, I’ll walk you through the steps to upload files to Google Drive, ensuring that you can do it efficiently and effectively.
Choosing the Right Files to Upload

Before you start uploading files, it’s important to consider which files you want to store on Google Drive. Think about the type of files you’ll need to access frequently, the size of the files, and how much storage space you have available. Here are some common file types that are often uploaded to Google Drive:
| File Type | Description |
|---|---|
| Documents | Word documents, PDFs, and other text-based files |
| Photos and Videos | Images and video files in various formats |
| Spreadsheets | Excel files and other spreadsheet formats |
| Presentations | PowerPoint slides and other presentation files |
| Audio | Music and other audio files |
Once you’ve identified the files you want to upload, you can proceed with the process. Here’s how to do it:
Uploading Files to Google Drive
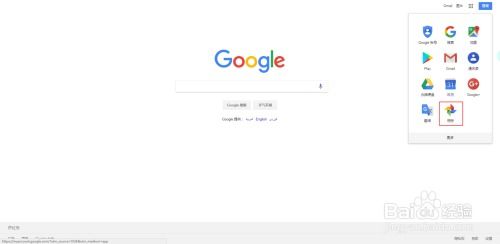
1. Access Google Drive
Open your web browser and go to drive.google.com. If you’re not already signed in, you’ll need to log in with your Google account credentials.
2. Upload a Single File
Click on the “New” button in the top-left corner of the screen. From the dropdown menu, select “File upload” or “Folder upload” depending on whether you want to upload a single file or multiple files/folders.
Locate the file you want to upload on your computer and click “Open.” The file will begin uploading to your Google Drive.
3. Upload Multiple Files or Folders
For uploading multiple files or folders, you can use the “File upload” or “Folder upload” option as well. Instead of selecting one file, you can choose multiple files or an entire folder by holding down the “Ctrl” (or “Cmd” on a Mac) key while clicking on the files or folders you want to upload.
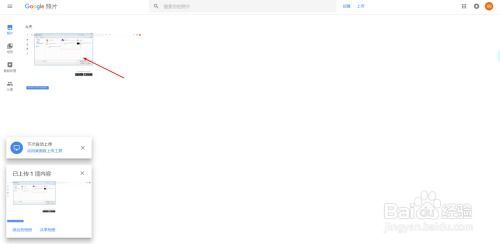
4. Wait for the Upload to Complete
Once you’ve selected the files or folders you want to upload, the process will begin. Depending on the size and number of files, it may take some time for the upload to complete. You can monitor the progress in the upload queue at the bottom of the Google Drive interface.
5. Access Your Files
After the upload is complete, you can access your files by navigating to the appropriate folder in your Google Drive. You can also search for files using the search bar at the top of the screen.
Additional Tips for Efficient File Management
1. Use Organized Folders
Keep your files organized by creating folders within Google Drive. This will make it easier to find and manage your files in the future.
2. Share Files and Folders
Google Drive allows you to share files and folders with others. Simply right-click on the file or folder you want to share, select “Share,” and enter the email addresses of the people you want to share with.
3. Set Permissions
When sharing files, you can set permissions to control what others can do with your files. For example, you can allow others to view, edit, or comment on your files.
4. Use Google Drive on Mobile Devices
Google Drive is also available on mobile devices, allowing you to upload, access, and share files on the go


