
Kali Linux ISO File Download: A Comprehensive Guide
Are you looking to download the Kali Linux ISO file? If so, you’ve come to the right place. Kali Linux is a popular operating system used for penetration testing, digital forensics, and ethical hacking. In this guide, I’ll walk you through the process of downloading the Kali Linux ISO file, as well as provide some tips and tricks to ensure a smooth installation.
Where to Find the Kali Linux ISO File

The official Kali Linux website is the best place to download the ISO file. Simply visit https://www.kali.org/downloads/ and you’ll find the latest version of Kali Linux available for download. The website offers both 32-bit and 64-bit versions, so make sure to choose the one that matches your hardware specifications.
How to Download the Kali Linux ISO File
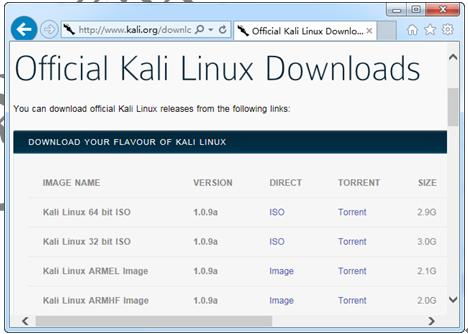
Once you’re on the Kali Linux downloads page, you’ll see a list of available versions. To download the ISO file, click on the version you want and then click the “Download” button. The file will begin to download to your computer. Depending on your internet speed, this process may take a few minutes to several hours.
Here’s a step-by-step guide to downloading the Kali Linux ISO file:
- Go to https://www.kali.org/downloads/
- Select the version of Kali Linux you want to download (32-bit or 64-bit)
- Click the “Download” button
- Wait for the download to complete
Verifying the Integrity of the ISO File

After downloading the Kali Linux ISO file, it’s important to verify its integrity to ensure that it hasn’t been tampered with. You can do this by using a checksum tool, such as md5sum or sha256sum. These tools are commonly available on most operating systems.
Here’s how to verify the integrity of the Kali Linux ISO file using md5sum:
- Open a terminal or command prompt
- Enter the following command, replacing “kali-linux-2023.1.iso” with the name of your downloaded ISO file:
- md5sum kali-linux-2023.1.iso
- Compare the output with the checksum provided on the Kali Linux website
Creating a Bootable USB Drive
Once you’ve verified the integrity of the Kali Linux ISO file, you’ll need to create a bootable USB drive. There are several tools available to help you do this, such as Rufus, balenaEtcher, and UNetbootin. In this guide, I’ll use Rufus as an example.
Here’s how to create a bootable USB drive using Rufus:
- Download Rufus from https://rufus.ie/
- Open Rufus and select the USB drive you want to use
- Click the “Select” button next to the “Boot selection” field
- Browse to the location of the Kali Linux ISO file and select it
- Click “Start” to begin the process
- Wait for Rufus to complete the process
Boot from the USB Drive
After creating the bootable USB drive, you’ll need to boot your computer from it. To do this, follow these steps:
- Insert the Kali Linux USB drive into your computer
- Restart your computer and enter the BIOS or UEFI settings
- Change the boot order so that the USB drive is selected as the first boot device
- Save the changes and exit the BIOS or UEFI settings
- Restart your computer and it should boot from the Kali Linux USB drive
Conclusion
Downloading the Kali Linux ISO file and creating a bootable USB drive is a straightforward


