
Unlocking the Hidden: Show and Hide Files in Finder
Have you ever wondered how to make certain files or folders invisible in Finder on your Mac? Perhaps you have sensitive documents that you don’t want others to stumble upon. Or maybe you simply want to declutter your desktop. Whatever the reason, showing and hiding files in Finder is a useful feature that many Mac users are not fully aware of. Let’s dive into the details of how to do this effectively.
Understanding Hidden Files and Folders

Before we get into the nitty-gritty of showing and hiding files, it’s important to understand what hidden files and folders are. In the world of computing, a hidden file or folder is one that is not immediately visible to the user. This is often done for security reasons or to keep the user interface clean and uncluttered.
On a Mac, hidden files and folders are not actually invisible. They are simply not displayed by default in the Finder. This means that they can still be accessed if you know where to look or how to make them visible.
How to Show Hidden Files and Folders
There are several ways to make hidden files and folders visible in Finder. Here are some of the most common methods:
-
Using the Terminal
-
Using the Go Menu
-
Using a Third-Party App
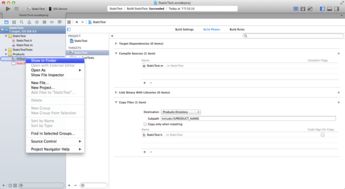
Using the Terminal
One of the most straightforward ways to show hidden files and folders is by using the Terminal. Here’s how you can do it:
-
Open the Terminal application, which is typically located in the /Applications/Utilities/ folder.
-
Enter the following command: `defaults write com.apple.finder AppleShowAllFiles YES` and press Enter.
-
Restart Finder by opening a new Finder window or by pressing Command + Option + Escape and selecting Force Quit Finder.
-
Hidden files and folders should now be visible in Finder.
When you’re done, you can hide the files again by entering the command `defaults write com.apple.finder AppleShowAllFiles NO` and restarting Finder.
Using the Go Menu
Another way to show hidden files and folders is by using the Go menu in Finder. Here’s how:
-
Open a Finder window.
-
Press Command + Shift + G to open the Go to Folder dialog box.
-
Enter the following path: `/Users/YourUsername/.Trash/`. This will show all hidden files and folders in the Trash.
-
Click Go, and you’ll see the hidden files and folders.
Keep in mind that this method only shows hidden files and folders in the Trash. To show them in other locations, you’ll need to use the Terminal method or a third-party app.
Using a Third-Party App
There are several third-party apps available that can help you show and hide hidden files and folders in Finder. Some popular options include:
| App Name | Description | Price |
|---|---|---|
| HiddenFiles | Simple app to toggle the visibility of hidden files and folders. | $2.99 |
| Finder Hidden Files | Extends Finder’s functionality to show and hide hidden files and folders. | $4.99 |
| Quick Hidden | Quickly toggle the visibility of hidden files and folders with a keyboard shortcut. | $1.99 |
These apps can be a convenient way to manage hidden files and folders without having to use the Terminal or the Go menu.
How to Hide Files and Folders
Now that you know how to show hidden files and folders, you might be wondering how to hide them again. Here are the steps to reverse the process:


